Announcement

Collapse
No announcement yet.

Skyline GTR build/project *lots of pics + document

Collapse
X
 
  • Filter
  • Time
  • Show
Clear All
new posts

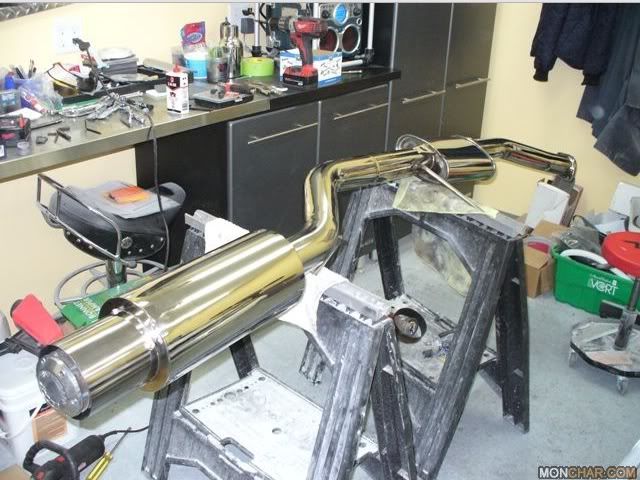
  • look what a fully polished cat-back loots like, its my old one that i sold, the new owner took things too a new level

    before selling it
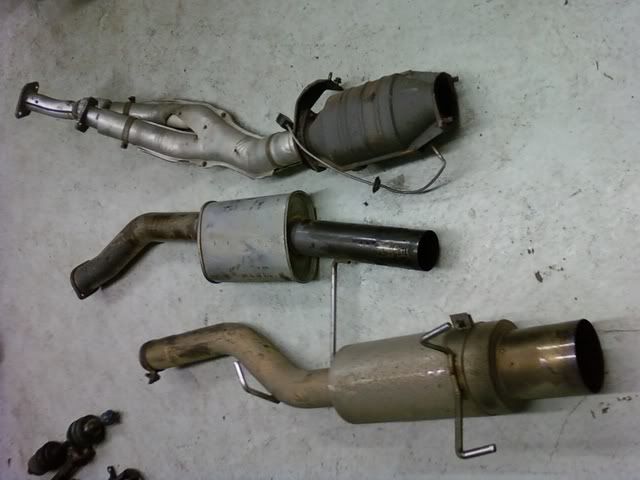

    before shipping it
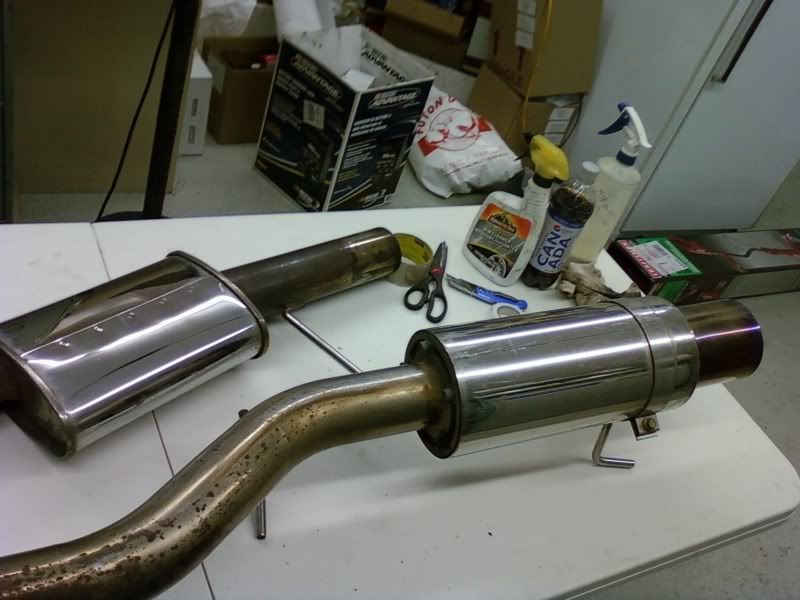

    what he accomplished in 6~7 hours
    sigpic

    [links to all chapters in first post]

    Comment


    • holy **** frank how did he do that? Some harry potter magic going on here i think !

      Comment


      • you can read the whole thing here
        sigpic

        [links to all chapters in first post]

        Comment


        • A big part of getting that shine , is the buffing
          My car keeps on stealing my money .

          Comment


          • holy god, thats an incredible shine! but ya gonna have to agree with DJ on this one, and thats something i only learned recently... the sanding procedure is basic and simple.. but to REALLY make things shine you need a proper buffing kit (i just got one.. 6 different compounds and a whole bunch of different felt wheels) so im gonna be re-polishing some of the things which i had "polished" in the past...

            on another note.... the word "polish"... isnt that the same word as the word for people from Poland? lol.... kind of funny to read this thread if you substitue one meaning from the other hahaha......


            well not much more progress yet, still just a little bit every day,
            (ive actually been busy prepping the exhaust line for POR-15 high temp paint, its quite the process...and ill put pics of that when im done)

            but yea, basically just got the koyo rad out now, man that was so much easier than i thought it would be... theres really nothing to pulling a radiator... 2 screws, thats it! and drained the fluid of course. thats tough to do with out spilling every where


            and then just as it was quick to do, i removed the upper and lower samco hoses and disconnected the defi water temp sensor.
            ive been labelling everything that disconnects with tape and names of parts, so the engine bay is starting to look like a battlefield with little white flags poping up everywhere declaring what they represent! lol


            i have a question though... does anyone know how to get rid of that brown slimey stuff from inside the block!???
            The SkyLife Community & News Website --> http://www.skylife4ever.com

            Comment


            • Well, another small-ish update...

              i started the night off by attempting to flush the brown slime out from the engine block... so i plugged in the rad hoses again, the bottom one would drain to a bucket, and the top one had a hose hooked into it for water feed from the tap... seemed like a good idea... so i turned on the tap water... the system pressurized but no water came out the bottom? i went in close to see whats up when all of a sudden *sploooosh*! the loosely place on upper rad hose lets go and im COVERED in brown slime water and coolant... my god, what a miserable odor...*


              well it seems like both me and all the people who suggested i do this, forgot about the thermostat... doh! anyway no harm done.. but lesson learned.. the hard way.


              well onto brighter things, to get back on track i started off by polishing the upper rad mounts and gave them a coat of clear to protect them...I think it'll look really sharp once its all back together... check the difference:


              Then I wanted to get more done on the exhaust plan... so after hours of work with the wire brush wheel to remove all the gunk, and grime and corrosion from the steel, i then sprayed the "metal ready" solution onto the steel, its basically just phosphoric acid and a few other chemicals which encourage the rust to peace outta there, and converts it all to this white powedery chalky stuff.... then i soaked it down with a hose to wash off all the excess acid solution. and used a towel to dry it off.... then all the hard work is done and all thats left is to apply the paint... its not THAT hard to work with the POR-15 paint... but its certainly requires care. it dries in about 3-4 hours to the touch at which point i applied a second coat... ill probably apply a third coat tomorrow. but its gonna look the same, so for arguments sake, heres that finished product:


              Then i wanted to do something that would serve a purpose and move me closer to the goal of engine out but i didnt feel like doing any heavy bolt torque or anything like that, so i started on the electrical and vacuum line connections. man theres a lot of them.

              so i disconnected all 4 defi sensors (boost, water temp, oil temp, and oil press.)


              Then i pulled the throttle cable off:


              and finally the entire main engine harness... this wasnt difficult at all, just took some time to label both parts of every connection and mark it down in my book..


              then.. to finish off the night in a ... really poop manner... i noticed my feet were soaking wet!!... and there was a growing puddle of water under my car...*

              WHY THE HELL IS IT RAINING IN JANUARY! +4 right now in Montreal, Canada... really quite concerned as to what im gonna do now that my garage is flooding... grrr..


              will keep you posted!
              The SkyLife Community & News Website --> http://www.skylife4ever.com

              Comment


              • +2С Right now in Ottawa... raining like in hell

                Comment


                • the weather has been acting a little rediculous latley, now we're back to winter though.

                  Well thanks to the much appreciated help of my neighbor, we managed to fix the problem that was causing the rain water to flood the basement... so its back to work on the car! woohoo! lol...

                  well i started off by finishing up some of the wiring and vacuum lines that were still attached.. like i said before, everything which gets disconnected.. recieves a flag with the location of its counter part listed... and it all gets written down what each tag means in my note book... so like you see here... EGT-1 and EGT-2... are obviously exhaust gas temp sensors.. 1 = front.. 2 = rear! pretty simple... but ya the whole engine is being done like that.


                  then at the suggestion of some people on the forum, to gain a little more room when it'll be needed most, i just un-bolted the fan.. really easy to do!


                  and then i wanted to get back to work on the exhaust system refresh:
                  so i started back with the de-cat pipe... look how corroded it is from driving just one summer!!


                  well after a little while with the wire brush wheel... it looks much cleaner:


                  and its the same sob story for the cat-back to axle forward part:


                  then i started on with the rather long and complicated and tricky procedure for using the POR-15 high temp paint.

                  step 1 (when starting with clean metal smooth surface).... had to spray the "metal-ready" phosphoric acid based spray onto the metal and let it soak in for 15-30 minutes all over...

                  step 2.... wash it all off with a hose and hang it up to dry over night...(important not to towel dry!!) supposed to leave the white chalky substance all over the steel.

                  step 3... after 2 days drying... you can finally apply the first coat of POR-15.. and it goes on really thin.

                  step 4.... after 2 days drying and curing ill be doing a second coat.. and a third coat... each coat becomes successivley thicker to apply...

                  so heres after the first coat:


                  and thats all for now, next hopefully we'll be making more progress in any number of areas!
                  The SkyLife Community & News Website --> http://www.skylife4ever.com

                  Comment


                  • more progress and a box of new parts!!!


                    well with the help of a friend i was able to seperate the power steering pump finally with out disconnecting the PS lines!


                    got a Full engine gasket kit for my RB26 motor!, she's gonna be sooo fresh!


                    then it wanted to make a little bit more progress in a different direction so i took off the caliper, pads, and rotor


                    then i took out the Tein coilover:


                    then the Cusco tension rod:


                    then disconnected the swaybar end link so not to damage it:


                    and finally took out the upper table AMS makes great products, after a year use its still in mint condition.l.. its just dirt encrusted! lol..


                    well more will come soon
                    The SkyLife Community & News Website --> http://www.skylife4ever.com

                    Comment


                    • Are you going to use Por-15 in the fender wells as well? Or just pulling everything to clean?
                      Check out the GTST Projects page and keep up to date with my build!
                      www.nelsonmx.wordpress.com
                      Like us on Facebook! www.facebook.com/NelsonMX
                      Any part inquiries can be forwarded to marc@nelsonmx.com

                      Comment


                      • @marc well ill be washing it all down with water... then with the wire brush wheel.. and then only put POR-15 on bare metal spots (if there are any?), then ill be applying rubberized undersealant... the suspenion arms and ocmponents have all been cleaned and some of them are being painted.


                        well got right back into it today finishing up the front wheel well area on either side (photos are only of passeneger side but driver side is the exact same thing).... that above ^^^ is the lower control arm with 2 ball joints... rather than attempt to seperate those ball joints it was far easier to just remove the whole assembly... no damage to balls that way lol...

                        then after letting these beasts soak in WD40 all night, about 15 seconds with the impact gun had these off no problem....axle nuts and cotter pins


                        then just pulled the spindle off and thats how it'll stay... i tried for hours to free the tie rod end and just couldnt get it off.. i even bought a new pickle fork kit... tried everything and it refused.. so i didnt want to break it, therefore it stays like that... theres no reason to take it off anyways at all...

                        and don't forget at this step to remove the ABS sensor as well (thats it wrapped around the brake line)


                        and finally getting a couple of things ready for paint.... i just spent hours cleaning them with the wire brush wheel, then a spray with phosphoric acid (acts as a great primer) .. a wash in water to remova the excess after 30 minutes of acid.. and now letting it dry over night.... after this its paint time!

                        The SkyLife Community & News Website --> http://www.skylife4ever.com

                        Comment


                        • ok so continuing on with the work...

                          time to remove the axles... it was really easy, 6 nuts and bolts to remove the passenger side front axle,. and it comes right off!


                          next i wanted to get the AC pump ready cause it needs to be free when the motor starts to come up and out so that you can jimmy it around.. also this way i don't have to empty my AC system and risk passing out from lack of air! lol...

                          and this is a special tool i made... its actually a long tall skinny house lamp.. that i "modified" to fit over the end of my wrench... this is actually one of the hardest bolts ive had on the car!!! soooo long and its position makes my back hurt lol...

                          once that miserable bolt was out...(its also the longest of the 4!! grr)... the other 3 were a breeze... andddd its free!!


                          now to get to some of the good stuff... my silicone heater hose kit came in today!! its nothing super special just direct replacement for the 20 year old heater hoses under the intake plenum...


                          and heres the finished product of those parts i prepped last week... like i said... wire wheel brush, phosphoric acid dip for 30 minutes, rinse in water, dry over night or 2.... many many light coats of metal flake red... many light coats of clear top coat... and we have this!... its the front spacers, rear spacers, front brake caliper pin pressure plate thing, and axle nut cap thing...i did these because these pieces are visible when you look at the car and on most cars they're covered in rust... i don't want that! so, these will clean easily with water after a long drive.


                          and heres the parts for the wheel well all organized, cleaned and ready to go back in when the time calls for it!
                          The SkyLife Community & News Website --> http://www.skylife4ever.com

                          Comment


                          • Spacers are looking good!
                            “Hey, come on, its a car right? No. It’s a symbol of your history, its a thread of continuity from which you came to where you are. It’s important that you don’t want to forget who you are.” -Dr.Phil in "Love the Beast"

                            Comment


                            • cest kand tu sort le char du storage toe on devrais sarrenger un MEET au julep juste les SKYLINE !!!


                              865 whp RB32 , R32 GTR , THE LUCKY GTR *SUMMER DRAG BEAST*
                              2013 Rams Laramie LongHorn 3500 Crew cab *Daily Driver*

                              Comment


                              • Damn..

                                Should have bought hoses.. LOL

                                I put mine back on last night when i was doing my FMIC and ... well, they're crap Doing a leak down test this afternoon to see if ive got any issues, hopefuly not cuz that effin plenum is a piece to get off..

                                That red paint looks a lot better in person..

                                What do you guys think about him doing his valve covers with that paint? I think it'd look pretty bad a$$..

                                PS. Your exhaust is in good hands..... maybe.. lol
                                Check out the GTST Projects page and keep up to date with my build!
                                www.nelsonmx.wordpress.com
                                Like us on Facebook! www.facebook.com/NelsonMX
                                Any part inquiries can be forwarded to marc@nelsonmx.com

                                Comment

                                Working...
                                X