Announcement

Collapse
No announcement yet.

Skyline GTR build/project *lots of pics + document

Collapse
X
 
  • Filter
  • Time
  • Show
Clear All
new posts

  • Originally posted by archaeic_bloke View Post
    my lines are the shorter ones, designed to go either behind the front grill, or in front of the BOV's....

    not ditching the AC... it still works totally! just need a re-charge and that high pressure line from you! lol , want to keep it 100% for sure lol

    um my couplers i believe are 80mm, they came from Vibrant USA through Z-tune they were $9.45 canadian each... so ya, quite expensive.

    yah, haig chopped the bottom off my oem shroud to make it fit... it does fit, i think what happens with haig is he has SOOO much on his mind sometimes he doesnt say/remember exactly what he did when and where... lol godly mechanic but waaay overworked.
    this where mine is right now, but thats too many heat exchangers in the same area, why i'm moving it


    oh yeah forgot about that a/c line, didn't remember, it seems everyone ditches the a/c, but us

    crap about the couplers... now that Z-tune is RIP

    and yeah, haig is overworked for sure, hes not THE expert for nothing
    sigpic

    [links to all chapters in first post]

    Comment


    • I think to bleed your altessa you need to unplug a yellow and green wire on your drivers side kick panel then turn your ignition on until you hear the pump in your trunk kick in then crack the bleeder valve where it connects to your transmission and bleed it. Make sure to bleed a bit then add fluid and bleed until air is out of the line then reconnect the green and yellow wire plug in. I think that is what i did last year when i replaced my clutch and had my tranny out.

      Comment


      • This may enlighten you. From a old post I made on another forum. Copy and paste. Nice build

        NOTE: You need Nissan ATF fluid for this application. Check step "4" first so you can have everything ready to go.

        Step 1: Fill tank 30mm above MAX line. "tank is located in right rear of your trunk"

        Step 2: Open air bleeder on oil pump. Crack open till there is no more air coming out and you get fluid dripping. "This air bleeder is located on the pump on top of the rear diff. Bleeder is on right side. Can’t miss it"

        Step 3: After you tighten up that bleeder you go and turn the ign on. Don’t start the car just turn the key to ign.

        Step 4: You need to unclip the air bleeder connector. " This is a white clip located under the dash on the right side behind your kick panel" Opposite side of your ECU" Might be a good idea to un screw your kick panel before you do any of these steps. When this connector is unplugged it puts the pump in (air bleeder mode) and the pump operates at a fixed hydro pressure to the transfer actuator"

        Step 5: You now need to bleed the nipple on the rear of the trans just below the tail shaft and above the hydro line attached to the rear of the trans. You want to give it 1-second blerps. You can hear the pump actuate while doing this. Do this step until there is no more air coming out the nipple.

        Step 6: Go back to the tank in the trunk to check the level of fluid. Fill to MAX is necessary or just above. Now to finish the bleeding process you need to go back into the car to the air bleeder connector. You want to plug it back in and then UN plug it and plug it back in. You want to repeat this process until the lower level fluid in the tank in your trunk has a 5mm max air gap between the lower and higher level fluid. I had to plug in and unplug my bleeder sensor about 20 times at least. If you want get a friend to check the rear level while you sit in the car unplugging the bleeder sensor that might be easier. I had to do this on my own :P


        If this doesn’t make any sense let me know and I can retype it for you guys I’ve done a search on this info this week and also about a year ago on this forum and never came up with anything conclusive so now we got it.

        This is the tank in your trunk. I didnt get any before pictures but this gives you an idea of the high and low level's of fluid and how it should look when your finished.


        This is the bleeder on the pump above the diff. Its on the right side of the diff. Very easy to spot:


        This is the bleeder on the trans. I used a clear hose so I could watch the air shoot out.


        This is the air bleeder connector. The fsm tells you to make a switch but it is easy to plug in and un plug many times.
        ALLEN PETERSEN
        Number (604) 961-2449
        4XTOYS/ Lower Mainland Skyline Service and aftermarket RB parts.
        RB30`s for sale!

        Comment


        • @jdms13rhd - wow!! thanks for the great walk through, ill follow it when the time comes! (which looks like a day or 2)

          so I've been in the midst of dealing with a family emergency these last 3 days, been at the ER every day.. not so much fun!!! but having to skip work during the day has opened up some hours to do some work in the evening now... so i bolted up the new RS*R downpipe:


          then i decided i would focus on the wheel wells (yesterday and today)... so i started with the more difficult task first... fitting 2 new extended wheel studs to the passenger side knuckle... Reason... because i was an idiot when i was trying to remove the axle nut... put a pry bar in between 2 studs and leveraged it on the floor... people tell me often im a strong guy, y`know the kind that has broken a 50 pound bench vice by over tightening it... LOL (sorry dad! hahah) anyways that whole crap idea bent the 2 studs and they essentially just fell right out of the holes!!!

          so i used the only trick i knew to get the studs locked in tight... well, the only deep socket i had was the key for my "tuner nuts" ... they're the cheapo $2 a nut kind of thing... so i figured i could just blast through the end of the nut.,... LOL and i did!!! haha... right through! the friction generated SOOO much heat i burnt my thumb... hot enough to make water sizzle and evaporate instantly... but ya the technique is to use the impact gun and my spacer (as a big washer) and litterally pull the new stud into the knurls.... cause it cannot be done by hand, and its very hard to do using a hammer back there.

          anyway check out this poor tuner nut.....open ended lug nuts ftw..


          So after installing the new studs, i proceeded to re-install everything else: in this order, front drive axles, Tein coilovers, AMS front upper tables, lower table with balljoints, cusco tension rods, swaybar endlinks, axle nuts and cotter pin locks, rotors, calipers and pads. it went well with out a hitch, ... also before putting each item back on, if it had threads that were exposed (like the adjustable coilovers or tables or tension rods) i coated them with copper anti-seize compound. and on all the retaining nuts and bolts a dab of blue loctite!
          heres the passeneger side all finsihed:


          that weird white stuff in the photos on the painted parts is actually dust...lol the camera flash made it show up!
          and heres the drivers side after filling the front diff with gear oil.


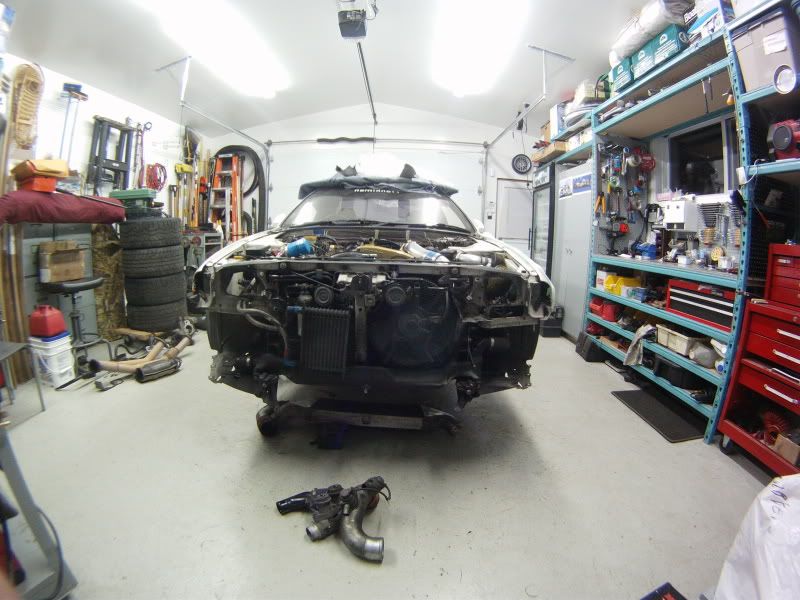
          and heres a photo of all thats left to put on... really not much left to do... i think i'll be firing it up tomorrow night ...possibly!
          Wish us luck!
          The SkyLife Community & News Website --> http://www.skylife4ever.com

          Comment


          • how you intalled your studs actually the right way to do ity,

            using any nut and enough spacers, torque it with an impact gun and the stud will settle into place

            man you garage looks dark, don't you have any lighting ?

            and your front wheel assembleis look like color orgies
            sigpic

            [links to all chapters in first post]

            Comment


            • Originally posted by jdms13rhd View Post
              This may enlighten you. From a old post I made on another forum. Copy and paste. Nice build

              NOTE: You need Nissan ATF fluid for this application. Check step "4" first so you can have everything ready to go.

              Step 1: Fill tank 30mm above MAX line. "tank is located in right rear of your trunk"

              Step 2: Open air bleeder on oil pump. Crack open till there is no more air coming out and you get fluid dripping. "This air bleeder is located on the pump on top of the rear diff. Bleeder is on right side. Can’t miss it"

              Step 3: After you tighten up that bleeder you go and turn the ign on. Don’t start the car just turn the key to ign.

              Step 4: You need to unclip the air bleeder connector. " This is a white clip located under the dash on the right side behind your kick panel" Opposite side of your ECU" Might be a good idea to un screw your kick panel before you do any of these steps. When this connector is unplugged it puts the pump in (air bleeder mode) and the pump operates at a fixed hydro pressure to the transfer actuator"

              Step 5: You now need to bleed the nipple on the rear of the trans just below the tail shaft and above the hydro line attached to the rear of the trans. You want to give it 1-second blerps. You can hear the pump actuate while doing this. Do this step until there is no more air coming out the nipple.

              Step 6: Go back to the tank in the trunk to check the level of fluid. Fill to MAX is necessary or just above. Now to finish the bleeding process you need to go back into the car to the air bleeder connector. You want to plug it back in and then UN plug it and plug it back in. You want to repeat this process until the lower level fluid in the tank in your trunk has a 5mm max air gap between the lower and higher level fluid. I had to plug in and unplug my bleeder sensor about 20 times at least. If you want get a friend to check the rear level while you sit in the car unplugging the bleeder sensor that might be easier. I had to do this on my own :P


              If this doesn’t make any sense let me know and I can retype it for you guys I’ve done a search on this info this week and also about a year ago on this forum and never came up with anything conclusive so now we got it.

              This is the tank in your trunk. I didnt get any before pictures but this gives you an idea of the high and low level's of fluid and how it should look when your finished.


              This is the bleeder on the pump above the diff. Its on the right side of the diff. Very easy to spot:


              This is the bleeder on the trans. I used a clear hose so I could watch the air shoot out.


              This is the air bleeder connector. The fsm tells you to make a switch but it is easy to plug in and un plug many times.

              Go post it in the DIY section sticky!
              Need detailing done to your car? I'm open to travel to detail your car :

              http://forums.gtrcanada.com/group-buys/54899-ontario-cobraa-detailing-group-buy.html

              Please follow my works and latest news/promotion at : https://www.facebook.com/Waxxonspa || Waxxon.com ||

              Comment


              • in this update: Problems with the engine... videos, and photos... please read!

                so i continued with the re-install of all the components, intakes and pipe work....


                then installed the intercooler and the remainder of the piping, the wheels and bolted everything together


                ignore the fluids under the car and the photo in the background of the police with **** in the face (LOL)


                so the only thing left to do was fill the fluids... i filled the oil, the coolant, the power steering fluid, and Atessa...

                - can someone explain how to "burp" the power steering system? i think there is air trapped in the lines, but the reservoir is full, and it turns left and right without any problems at all...

                anyways, primed the oil pump by unplugging the CAS, then plugged it back in and fired it up, went well first try she was rolling good! let it run for a few minutes then noticed smoke coming from the exhaust side/turbo side of the engine, freaked out, shut it down right away.
                (i just uploaded these so give the videos 15 minutes to complete uploading)
                video of startup...http://www.vimeo.com/11915283

                looked under the car, a pool of coolant, small but still coolant, looked around couldnt see where it might be coming from, only thing i could think of was turbo water lines, the return part where it connects to the block maybe?

                anyways dried it all off and started it up again... no leak!... so im thinking maybe the coolant was just from all the coolant i had spilled everywhere about an hour ago...

                Video of smoke...http://www.vimeo.com/11915408

                so i let it run again for 5 minutes and it starts to smoke again from the turbo side!... so im smelling and it DOESNT smell sweet (coolant), nor does it smell like oil, nor like anything ive ever smelled before...... i did spill power steering fluid all over about a day ago though so im thinking maybe its just that burning off of everything so i let it run, and rev the engine a bit... the smoke doesnt not come out more or less with revs revving changes nothing, all the same but constant smoke none the less, and its really just a light light smoke by no means is this heavy... its a white/gray smoke and i can not describe the smell.


                then i figured well, i better move the car around to see if its anything i can notice while driving... i drove around the block, oil pressure was amazing 3.5 bar minimum when hot, higher around 6.5 bar when cold and revving.. i even let it build boost to like 0.5 bar and it worked amazingly!!!

                aside from the smoke i don't notice any issues at all... but why oh why is there smoke?

                - i don't think its an exhaust leak, the oil and water are fine, theres nothing leaking anywhere...
                - how long would it take to burn off all the power steering fluid u think?


                please guys, throw me some ideas, im exhausted, and frustrated and very upset about this, i took my time and tripple checked everything....
                The SkyLife Community & News Website --> http://www.skylife4ever.com

                Comment


                • When you take stuff apart you tend to get oil on stuff. Mostly you get oil on the exhaust manifolds and it causes smoke. It goes away eventually. I can't see your video so I'm not sure what it is (your videos are private so no one can view them, or maybe I have to make a vimeo account??). The burning of oils (or wtvr) off the manifolds may smell a bit funky. Also your head gasket might me blown (im not sure I'd have to look at it). If you want I can take a look and help you out. Call my cellphone, if I don't answer leave a voicemail. If the car drives good thats a good sign so don't stress yourself too much. I'm sure its nothing major. Also your valve cover may be leaking.

                  Comment


                  • can't be a blown HG, the engine has just been overhauled by Autoworx..
                    sigpic

                    [links to all chapters in first post]

                    Comment


                    • (videos should work now)
                      its not a head gasket or really anything engine related, ive calmed down a lot now (had a shower...)

                      im thinking its any of the following:

                      1) something external thats dripping on or around, the exhaust
                      2) no fluid in the power steering pump (for some reason) and my PS pump is burning up
                      3) oil not getting to the turbos and my ball bearings are starting to fry (but like i said, they spin freely, and i drove the car and they boost fine)
                      4) residual oils on components burning off.

                      i dono, ive decided that tomorrow im gonna start it up again, and see if it still smokes, if it does i will remove things from the turbo side and see what i can see!

                      keep the advice coming.
                      The SkyLife Community & News Website --> http://www.skylife4ever.com

                      Comment


                      • i cant see the video, but from what im hearing, i had the same thing. its normal.

                        smoke coming up out of somewhere on turbo side, yeah, mine does it for a few minutes too after i swap turbos. not sure exactly what it is, but a little drive makes ot go away for good. dont worry about it.
                        GTRC-OG

                        Comment


                        • I assume you have all new gaskets on the exhaust side, they tend to smoke for a bit while they burn in. That is unless your running steel ones versus some composite stuff.
                          Jesse
                          1990 HCR32
                          2006 Chev Silverado

                          Comment


                          • so what size are your couplers after all ? vibrant ?
                            sigpic

                            [links to all chapters in first post]

                            Comment


                            • so i thought id update while im at work now just to put everyone on the same page, no photos until later tonight, or tomorrow morning.

                              @frank i think they're 80mm diameter.. from vibrant ya, ill check tonight to confirm the diameter but like is aid, they were $9 a pop! and i needed 8 of em! but, they're fresh and make a great seal.

                              so heres where we stand on the situations...

                              ill address each problem indivudually:

                              smoke from turbo side.... ive now driven the car and run it for more than an hour and the smoke has stopped all together!!! thanks to everyone who suggested its the new gaskets bedding in, you were 100% correct (and thanks to all those who made suggestions of any type, i really appreciated it)

                              super loud banging when going over bumps... while test driving last night i noticed a SUPER loud banging while going over holes and bumps and couldnt figure it out because it was like the shocks were non-existent!..... so i went to be last night a little out of it (one too many brews hahaha) and woke up this morning with the answer to this problem AND the oil leak problem!.... SOLUTION... after seeing in a dream.... in` the suspension setup, everything is either rose joinnted or ball jointed... everything except one part! front upper tables, i re-call i cranked the nuts on there SUPER hard... so instead i took them off today and put loctite and only did them about 3/4 the force i used last time....

                              it worked! took it out for a spin and NO more banging... u see, the bolts were so tight that the tables were not able to move freely up and down! problem solved.

                              the oil leak turbo side... well i suppose its not the best location or the worst. its definitley leaking oil from the turbo side. in particular its leaking from the T-bolt that bolts into the block and supplies oil to the 2 oil feed lines, the problem is a bad seal around the copper crush washers, i recall having trouble with that bolt when installing it and maybe the washers not being clean enough, so im gonna have to re-do those 2 washers and re-install the bolt,

                              thats kind of hard to do with the engine in the car but i also dreamt up a solution... i can get to the bolt somewhat easier i remove the passenger side front drive axle, so ill do that monday.


                              on another note, i put all the body panels on the car and everything else wors 100% perfectly... it seems i didnt miss a single connection or anything.

                              over boosting... now i was told by my mechanic at autoworx that to limit the boost properly all i needed to do was plug everything back in the way it was because the stock boost solenoid would limit it properly... during my test drive i eased on boost slowly... and it rised above 0.7 bar!! and then even for a split second above 1.0 Bar and the defi alarm sounded so i let off... played back the gauge readings for the last 2 minutes... and yep, it spiked at 1.1 bar... so im gonna have to use my foot as the boost controller from now on until i fit a really proper boost controller. (im gonna speak to haig about this too)

                              so the car goes in june 10th to the shop for the following:

                              - new spark plugs
                              - oil and oil filter change
                              - alignment
                              - fix any leaks that i couldnt get (there may be an intermittenent coolant leak around the rear of the motor.. its not consitent so im not sure yet)
                              - if i have enough money, new ACT 6 puck clutch, re-surface flywheel, braided clutch line, and clutch damper circuit delete.


                              then ill fit a boost controller and i just have to finish what im doing with my interior.


                              ill keep everyone posted, thanks for all the help guys!
                              The SkyLife Community & News Website --> http://www.skylife4ever.com

                              Comment


                              • I have a re-surfaced flywheel for dirt cheap if you need it. I resurfaced it and then ended up buying a new clutch that came with a flywheel. My loss, your gain, if you want it!!!

                                Glad to see everything is working good.

                                Comment

                                Working...
                                X