 Tweet
Tweet
This is a much more simplified version of Greddy's online manual, or Greddy's instruction manual that comes with the unit.
Difficulty ; if you have the user manual and have no real understanding of your stock turbo system, difficult.. Otherwise this should really help cut down time!
Tools;
Wire cutters or scissors > for cutting the hose
Jubilee clamps or zip ties > to make sure nothing pops off in the future!
Pliers
10mm socket or spanner > to place unit on the steering pump reservoir bracket
Box knife or exacto blade > to splice rubber grommet on firewall
1 3/16th's (4.7mm) hose fitting > Helps speed the process up
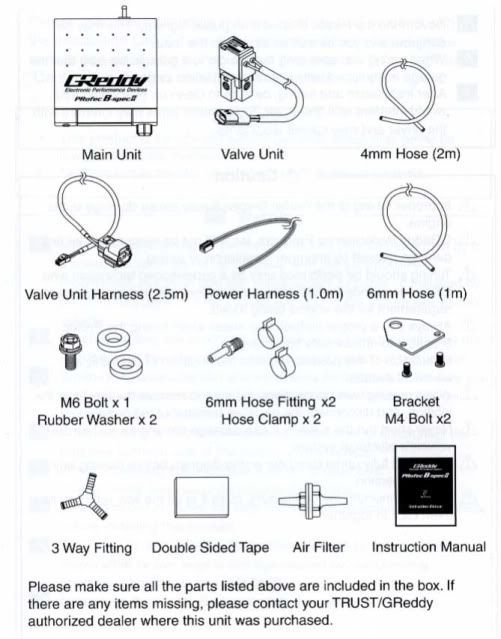
Here are the contents of the box.
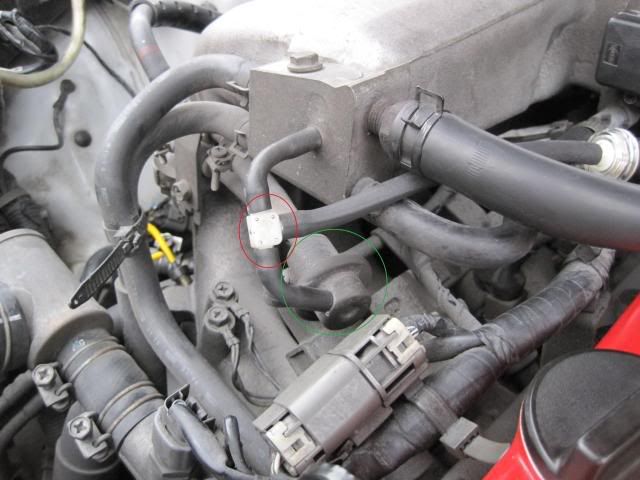
Step 1.
-Locate FPR (Circled GREEN in photo)
-Locate the VAC hose from the FPR to the Intake Plenum and install the 3 way splitter. (Circled RED in photo)
-Add the LONGEST hose to the 3rd nipple and zip tie each end TIGHT.
-Ensure there are no restrictions in the tubing, ie crimps or folds.
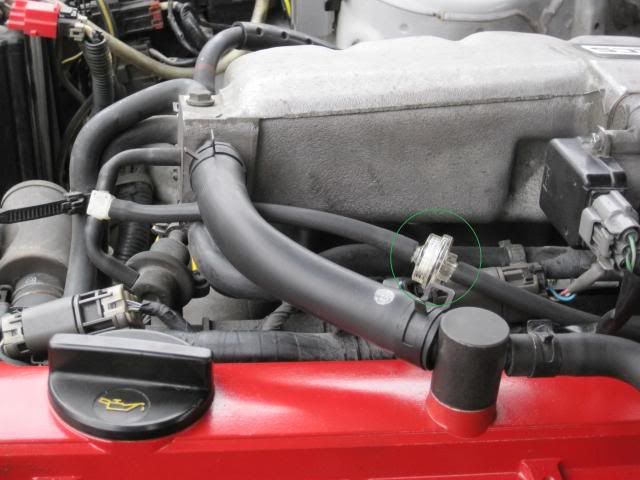
Step 2.
-On the newly added line, splice in your Filter (Circled GREEN)
-Make sure it's on right! (Black o-ring towards unit)
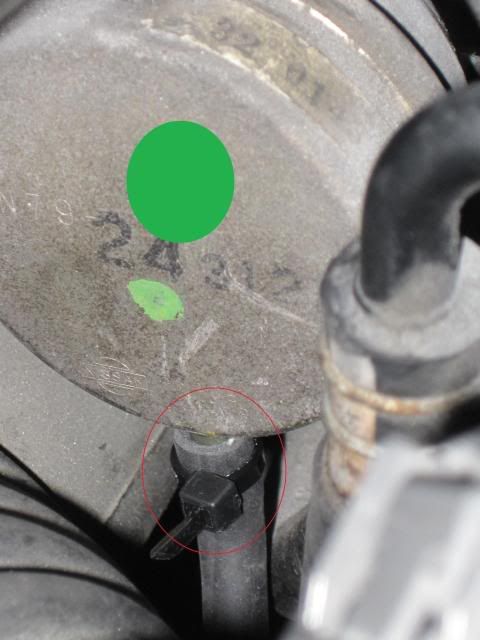
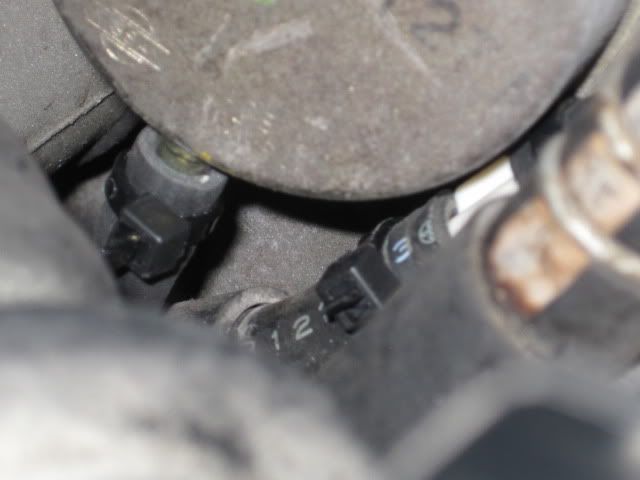
Step 3. *Will be easier if you remove your airfilter/airbox and MAF to get to actuator*
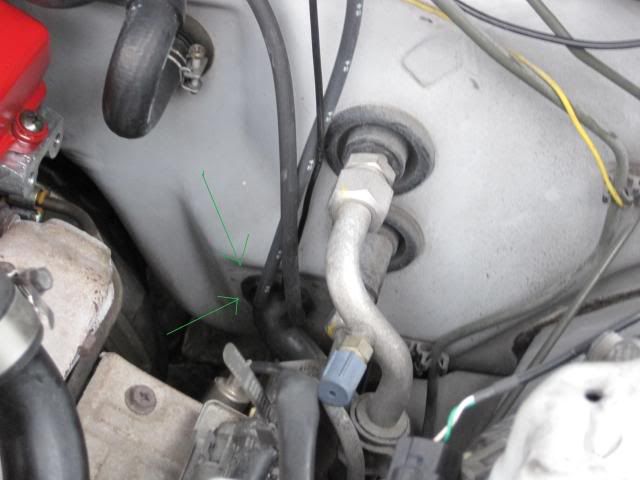
-Locate your wastegate actuator (Circled GREEN)
-Locate the hose at the bottom. (Circled RED)
This hose runs from the actuator to the compressor housing.
-Use your pliers to bend off the clamp and pull the hose off the ACTUATOR.
-Leave the hose attached to your compressor housing.
Step 4.
-Take your hose fitting (3/16th's, 4.7mm) and put it in this hose and clamp it.
-Take the shorter, 6mm hose and tap it onto this fitting and clamp it. DONT CUT IT YET
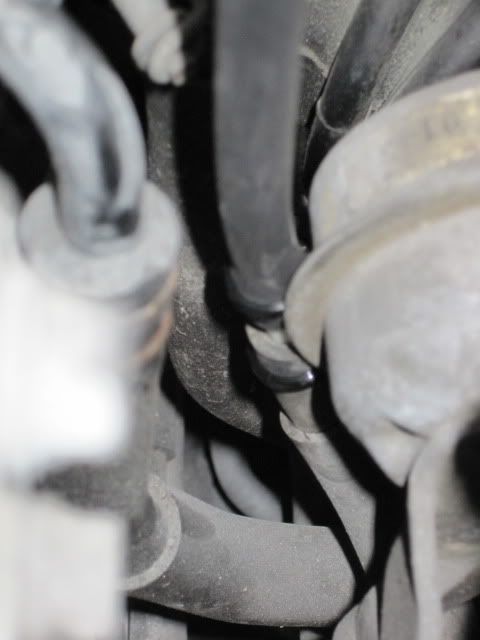
Hard to see but simply, it was the hose on the actuator, spliced to a new hose.
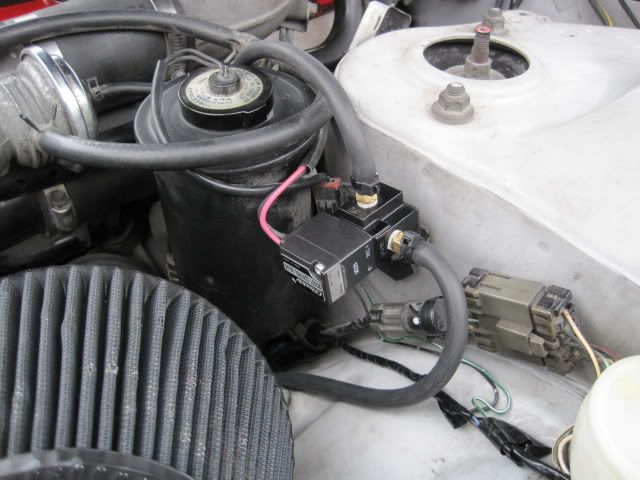
Step 5.
-Mount your solenoid -Easiest place is on the steering pump reservoir bracket and its cushioned with rubber mounts so the given mounting bolt is no longer needed.
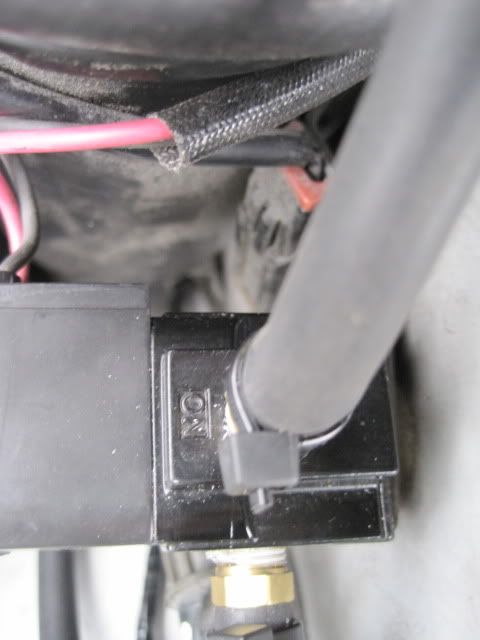
-Size up the tubing that you just fitted to see how much you need to cut off.
***REMEMBER, THIS TUBE GOES TO THE 'NO' on the solenoid****
Install on 'NO' fitting
Step 6.
-Take remainder of hose (Should be quite a bit)
-Fit this hose the the Actuator nipple at the bottom where you firstly removed the hose to the compressor housing. (Circled RED)
-This part is tough; put some spit on your finger tips and rub it on the nipple (LOL) itll make the hose slide on slightly easier.
-Zip tie/clamp this nice and snug and run the hose up to the solenoid
***REMEMBER, THIS TUBE GOES TO THE 'COM' on the solenoid****
Install (cut if you need to shorten it) on the 'COM' fitting
Step 7.
-Now that the hard part is done, reinstall your maf and airfilter before carrying on. Trust me, do it lol.
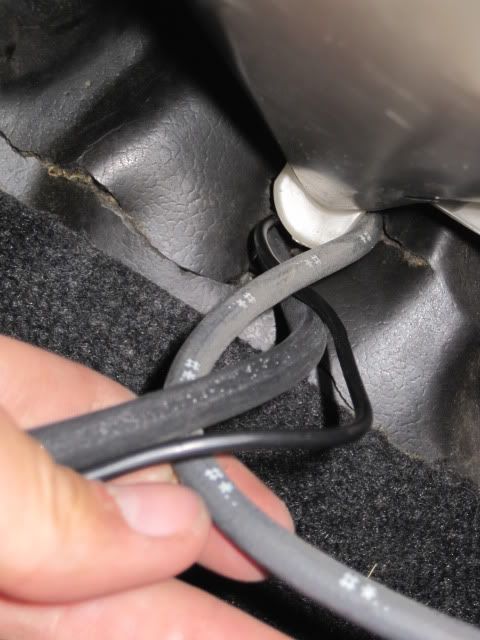
Step 8. - running the tubing / wiring inside the cabin
-Firstly, locate the rubber grommet on the passenger side firewall
-Then go inside the passenger foot well and locate it there as well
-Use your exacto or blade and carefuly make an incision on the grommet large enough to pass your Vac tube and wiring looms.
-Poke a screw driver through from the inside and see where it is on the outside.
-Take your wiring (small white connector goes through the firewall! not the black one) and put it in from the outside, pushing it, and the screwdriver back through as a guide. If it gets a lil jammed up, push it with a flat blade, CAREFULY, from the outside and through the grommet.
-Keep checking you dont damage the wires or the connector.
Step 9.
-Do the same with the Vac tube.
Step 10.
-Take up the slack from the engine bay and push the wiring under the center console (easily slides under the vents)
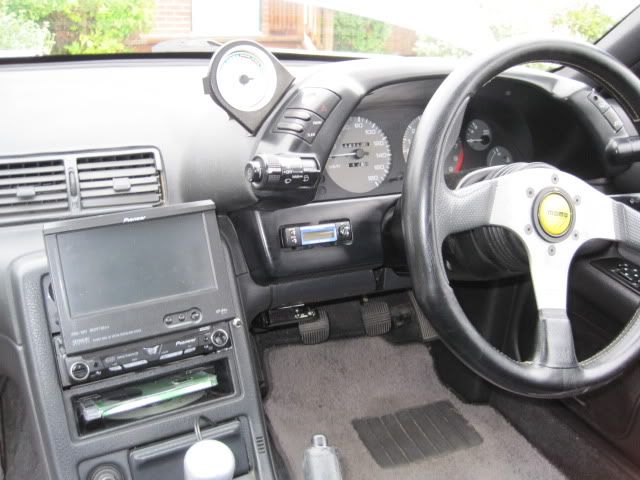
Step 11.
-Find a good place to mount your Greddy unit
-I chose here, after seeing a member mount one there as well. Really easy to read without having the steering wheel in the way, also easy to select between Hi/Lo settings without the need of a remote switch. Plenty of room in behind to mount it, so no worries for space.
(wish i did a write up for this )
)
**-If you want to mount here, simply remove the trim and pop off the two blank off caps (Rectangle things that should have buttons in them) and then dremel off the center ribbing then sand down. It fits PERFECTLY snug.**
Step 12.
-Run the POWER and GROUND for your unit.
-No pics, but i used a pretty nifty idea...
Power goes to cigarette lighter (orange wire) and ground goes to shifter mount bolt. Power to cigarette lighter (at least in my case) is ran by turning on headlights (either DRL or running lights). So now whenever i turn my headlights on which illuminates my dash, it illuminates my Profec unit too looks like it was always meant to be there!
Step 13.
-Install wiring to unit and Vac tube to unit.
Voila, it's now installed and ready for operation..
...... But before operation, please read the following to save yourself some grief..
Continue to next POST!
Difficulty ; if you have the user manual and have no real understanding of your stock turbo system, difficult.. Otherwise this should really help cut down time!
Tools;
Wire cutters or scissors > for cutting the hose
Jubilee clamps or zip ties > to make sure nothing pops off in the future!
Pliers
10mm socket or spanner > to place unit on the steering pump reservoir bracket
Box knife or exacto blade > to splice rubber grommet on firewall
1 3/16th's (4.7mm) hose fitting > Helps speed the process up
Here are the contents of the box.
Step 1.
-Locate FPR (Circled GREEN in photo)
-Locate the VAC hose from the FPR to the Intake Plenum and install the 3 way splitter. (Circled RED in photo)
-Add the LONGEST hose to the 3rd nipple and zip tie each end TIGHT.
-Ensure there are no restrictions in the tubing, ie crimps or folds.
Step 2.
-On the newly added line, splice in your Filter (Circled GREEN)
-Make sure it's on right! (Black o-ring towards unit)
Step 3. *Will be easier if you remove your airfilter/airbox and MAF to get to actuator*
-Locate your wastegate actuator (Circled GREEN)
-Locate the hose at the bottom. (Circled RED)
This hose runs from the actuator to the compressor housing.
-Use your pliers to bend off the clamp and pull the hose off the ACTUATOR.
-Leave the hose attached to your compressor housing.
Step 4.
-Take your hose fitting (3/16th's, 4.7mm) and put it in this hose and clamp it.
-Take the shorter, 6mm hose and tap it onto this fitting and clamp it. DONT CUT IT YET
Hard to see but simply, it was the hose on the actuator, spliced to a new hose.
Step 5.
-Mount your solenoid -Easiest place is on the steering pump reservoir bracket and its cushioned with rubber mounts so the given mounting bolt is no longer needed.
-Size up the tubing that you just fitted to see how much you need to cut off.
***REMEMBER, THIS TUBE GOES TO THE 'NO' on the solenoid****
Install on 'NO' fitting
Step 6.
-Take remainder of hose (Should be quite a bit)
-Fit this hose the the Actuator nipple at the bottom where you firstly removed the hose to the compressor housing. (Circled RED)
-This part is tough; put some spit on your finger tips and rub it on the nipple (LOL) itll make the hose slide on slightly easier.
-Zip tie/clamp this nice and snug and run the hose up to the solenoid
***REMEMBER, THIS TUBE GOES TO THE 'COM' on the solenoid****
Install (cut if you need to shorten it) on the 'COM' fitting
Step 7.
-Now that the hard part is done, reinstall your maf and airfilter before carrying on. Trust me, do it lol.
Step 8. - running the tubing / wiring inside the cabin
-Firstly, locate the rubber grommet on the passenger side firewall
-Then go inside the passenger foot well and locate it there as well
-Use your exacto or blade and carefuly make an incision on the grommet large enough to pass your Vac tube and wiring looms.
-Poke a screw driver through from the inside and see where it is on the outside.
-Take your wiring (small white connector goes through the firewall! not the black one) and put it in from the outside, pushing it, and the screwdriver back through as a guide. If it gets a lil jammed up, push it with a flat blade, CAREFULY, from the outside and through the grommet.
-Keep checking you dont damage the wires or the connector.
Step 9.
-Do the same with the Vac tube.
Step 10.
-Take up the slack from the engine bay and push the wiring under the center console (easily slides under the vents)
Step 11.
-Find a good place to mount your Greddy unit
-I chose here, after seeing a member mount one there as well. Really easy to read without having the steering wheel in the way, also easy to select between Hi/Lo settings without the need of a remote switch. Plenty of room in behind to mount it, so no worries for space.
(wish i did a write up for this
) **-If you want to mount here, simply remove the trim and pop off the two blank off caps (Rectangle things that should have buttons in them) and then dremel off the center ribbing then sand down. It fits PERFECTLY snug.**
Step 12.
-Run the POWER and GROUND for your unit.
-No pics, but i used a pretty nifty idea...
Power goes to cigarette lighter (orange wire) and ground goes to shifter mount bolt. Power to cigarette lighter (at least in my case) is ran by turning on headlights (either DRL or running lights). So now whenever i turn my headlights on which illuminates my dash, it illuminates my Profec unit too
looks like it was always meant to be there!Step 13.
-Install wiring to unit and Vac tube to unit.
Voila, it's now installed and ready for operation..
...... But before operation, please read the following to save yourself some grief..
Continue to next POST!


Comment