Announcement

Collapse
No announcement yet.

Jordies '93 GTST Type M... Progress Thread

Collapse
X
 
  • Filter
  • Time
  • Show
Clear All
new posts

  • Originally posted by Special_K View Post
    dude! I'm totally on the same page with your taste! love the period correctness of it all.

    Looking to do something similar to the endless gtr for graphics as well.

    Please please can I get a set of your steering column gauge holders and nismo pedal set?!! both so incredibly awesome!
    Thanks for the kind words, PM'd you.

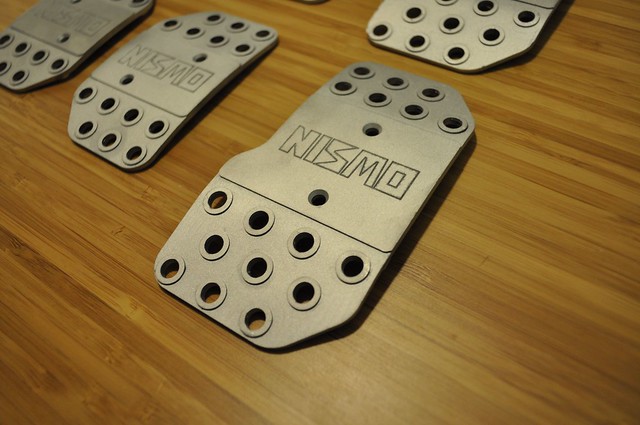
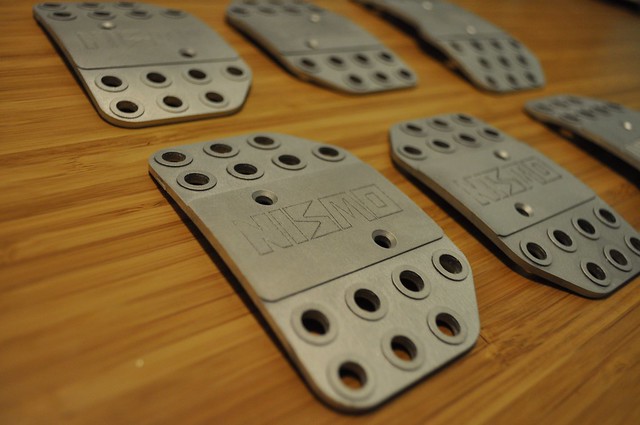
    Anyways I sent my pedals to Centerline Motor Sports and had Rene clean up the tooling marks with the sandblaster. I am so stoked on how they look.


    Last edited by S13Jordie; 03-06-2014, 11:31 PM.
    Jordie Lewis
    1993 Skyline Type M

    Comment


    • Anyways, Its starting to warm up a tiny bit here so I unwrapped the car and gave it a wash. No rodents or other creatures made the skyline its home over the winter so that made me happy.

      Hopefully this weekend it will be warm enough to start on my rear seat delete. I've ordered my sealed Moroso battery box and some remote battery terminals which are supposed to come sometime this week so I will update once they arrive.

      My Mishimoto radiator came in so I pretty much have everything I need to get the motor into the engine bay and mock everything up.

      I've made small progress on the scale replica as I can work in it inside.


      I've just printed my wangan wing today and it fits so well. Just need to sand and paint it to match.

      I also got some falken tires in to put on my nismos I printed a while back. Should look neat


      Small update, but things should start happening more frequently now.
      Jordie Lewis
      1993 Skyline Type M

      Comment


      • My birthday was at the beginning of April, But due to the shitty cold weather I postponed my party/ bbq until this past weekend (which turned out better because everyone had their cars out)


        It was a pretty good turnout for my small street. It also got my motivation back to where it needed to be, I brought the car out of hibernation.


        I ordered a sealed Moroso battery box to relocate my battery (legally) to behind the passenger seat. The box is sealed with an O-ring with the exception of a vent tube which exits the bottom of the car.


        A while ago I mentioned that I was going to make a rear seat delete cover. I really don't like the stripped out look of not having back seats but didn't want to keep the seats with the rear half cage either. I have been planning it out for some time now and it will look OEM ish when complete. The Idea is to have 2 lock boxes (doors) on either side of the driveshaft hump. One will give access to the battery and the other will provide storage for a small tool kit or whatever.

        I started my making some bracketry which mounts into existing mounting holes on the rear bulkhead. (excuse all the sound deadening. I will be properly cleaning this out)


        Then I made cardboard templates and cut everything out of 1/2" plywood. I am not too sure if this is the best material for the job, but Its cheap good for making ridged templates. I still need to cut the openings for the storage lockers in the top panel but the overall shapes fit nicely. The front piece is angled slightly so the whole structure doesn't look like a box and mimics the seat back.


        Since the battery is tucked away in the cabin, I machined a bracket to fit where the rear wiper was mounted and bought some remote battery terminals. This will allow the car to be boosted / trickle charged without going into the interior.


        I also picked up some machined wiper and spray nozzle plugs from the Alloy & Carbon store on ebay. They are quality pieces and I would recommend them to anyone.


        Last but not least. I got my wheels mounted on my R/C chassis (They still need to be sanded and painted) and I need to make some body mounts so it isn't slammed.


        I have set aside most of sunday to get frame of the rear seat delete finished and all the mounting holes drilled and tapped. More updates to come, thanks for reading.

        -Jordie
        Last edited by S13Jordie; 05-08-2014, 10:01 PM.
        Jordie Lewis
        1993 Skyline Type M

        Comment


        • Love the battery terminals and the rest of the build as well! Great to see you make a lot yourself, those pedals look incredible!

          Comment


          • Originally posted by ZLaSalle View Post
            Love the battery terminals and the rest of the build as well! Great to see you make a lot yourself, those pedals look incredible!
            I was starting to think that no one was reading this build. Thanks for the kind words, I actually got the idea from a mustang build I have been following on the pro-touring website.

            The auction for a set of wheels I am bidding on ends tomorrow. fingers crossed.
            Last edited by S13Jordie; 05-30-2014, 04:32 PM.
            Jordie Lewis
            1993 Skyline Type M

            Comment


            • I'm reading it Checking for updates every weekend!

              Comment


              • I had a decent weekend working on the car. I spent most of saturday cleaning my work shed and swapping stuff from my old motor to my new one. Lots of little work like swapping the pan / dipstick because it had been converted to rear sump to go in my friends 240Z. Got that all sealed up, cleaned all the accessories/ brackets and installed my GKTECH clutch fan. Now I must not have the original clutch fan because I was under the impression that I would need an adaptor to fit but it bolted straight up. There was no way for the adaptor fit. Either way It means that I have more clearance between the fan and aftermarket rad I have.


                I have purchased a new clutch and everything is ready to bolt into the car for the mockup. I WAS hoping to get that done this weekend so I could start mocking up the intercooler piping but my friend with the truck and engine crane got busy that will have to happen another time. I just want to get it off the stand.

                Many moons ago I had purchased a set of fiberglass N1 vents for my GTR bumper and thought since I couldn't get the motor in, I'd just install them.
                I measured 3289472893 times and cut once.


                Please don't mind the wavy bumper or the fact it looks like I just completed the Dakar Rally


                At first glance I was stoked.


                Spot on fitment. UGH. Now I have 2 gaping holes in my bumper. I dont know the best way to deal with this but I do have a couple Ideas. I may either section them to match the contour and glass them back together. Or cut a bezel from plastic (matching the N1 duct shape) and epoxy it in place and make my own. Either way its going to be more effort than I wanted it to be.


                Since there is a serious lack of cooling panels that suit the GTS-T, I prototyped this last week at work out of .0625" aluminum. It could use a little more fine tuning but overall I'm pleased with the outcome. Ideally I would like it to cover the headlights a bit more. It meets up with the hood quite well though.

                Without access to an engine crane and having hacked my bumper up, I thought it would be productive to finally wash the car and fit my aero for some more motivation. My friend Santi came by with his Silvia to help wash the engine bay of the skyline and we ended up taking some pics.


                Oh yea and a HUGE thanks to Anti (Martin) on here for sending me a Yahoo Auction link for a set of Tommy Kaira wheels. I ended up winning the auction and got them for a STEAL. They are the same style as the pair of 17's I already have but are step lipped 18x9 +25. One is bent so until I get that repaired / the lips replaced, I will run a 17 / 18 stagger setup.


                So stoked to finally have a matching set of these wheels to match my skirts and rear valance. True 90's Style.

                -Jordie
                Last edited by S13Jordie; 06-01-2014, 08:21 PM.
                Jordie Lewis
                1993 Skyline Type M

                Comment


                • No Love

                  Back to the N1 vent saga... I initially started trimming and sanding the edges to contour the vents, but the shape started getting a little distorted.

                  Plan B was to make my own since I had already hacked the bumper and have nothing to lose. First I measured up shape of the visible part of the vent and cut a pair of them from .125" polycarbonate on the router table at work.


                  I then took the existing fiberglass copies and cut the flange off, marked the contour of the bumper and cut it to fit.


                  I then scuffed up the bumper and plastic "bezel" and stuck it on using a 2 part epoxy. I do not have pictures of this step as it required both hands as well as a lot of taping to get the plastic to form the contour of the bumper.

                  Next using the 2 part epoxy I glued the inner vent in place, smoothing it out as needed.


                  I am by no means experienced at this but at the moment I have nothing to really lose (the bumper wasn't in the greatest shape to begin with). I refuse to pay $200+ for genuine N1 ducts as Id rather get the car together. The vent seems to be glued in there pretty solid. Over the next few days I will sand and fill as needed.

                  Thanks for reading

                  -Jordie
                  Jordie Lewis
                  1993 Skyline Type M

                  Comment


                  • The only good thing about fiberglass is that it is somewhat forgiving but I am a little skeptical about bonding it the OEM bumper. Where the vents are positioned there shouldn't be much flex, thus the risk of the filler cracking is lower. Because I used scrap clear plastic to make the bezels, I hit the vents with a little primer to better show the imperfections.


                    They still need a lot more sanding and filling work before they are truly "finished" but the next step would be to mock up the intercooler to make sure everything clears. I have a friend bringing by an engine crane (hopefully) this week so I can temporarily drop the motor in and figure out where all the piping will go.
                    Jordie Lewis
                    1993 Skyline Type M

                    Comment


                    • On the topic of work, Ive been super busy figuring things out with my career and will be starting a new job after the Canada Day long weekend. While i'm going to miss having the use of the printer and router table (I have a lot of things to make this week), more money is always welcome and the new company seems like it will be a good place to be for a while.

                      On to the project!

                      I had a bunch of buddies by on sunday to help put the motor in so I could mock up the engine bay (Intercooler piping ect.) I was fortunate enough to have 2 of the photographers from autoblog.ca to document everything. All watermarked pictures are taken from by my good friend Ronnie Fung. Check out his website: www.ronniefung.com

                      Lets get the party started.


                      Everyone showed up to give a helping hand. Its amazing the people that car culture brings together.


                      The one thing I forgot to get was a clutch alignment tool, we had a tough time getting the trans back on the motor but finally got there.


                      We finally got the motor in there, I will need to caress the clutch line as it slightly touches the manifold but other than that everything went according to plan

                      Then I had to put on my painted cam covers to see how everything would look


                      I am so stoked on how it looks. The engine bay will be repainted and smoothed after making holes for the intercooler.
                      Last edited by S13Jordie; 06-23-2014, 10:28 PM.
                      Jordie Lewis
                      1993 Skyline Type M

                      Comment


                      • It was an interesting last couple days in the office, at 2 am the main overhead water main broke and continued running until 4am. The motion detector was set off when the saturated ceiling tiles started to fall. By the time the water was shut off there was 4 inches of water on the floor of the entire office. I got the phone call not to come in because there was a cleanup crew / insurance investigation taking place which meant I had a day to start putting all the accessories on the motor and start mocking up the Intercooler.


                        The rebar had to be modified slightly to accommodate the bumper vents and the intercooler but It will be strengthened back up by welding in some plates. I believe I will mount the intercooler directly to the bumper rebar, It is stonger than any brackets I could make and I feel better about it being supported from the top rather than the bottom.

                        However, unfortunately the bumper ducts will have to be cut on the inside about 1/2" to allow the bumper to fit properly.


                        After fooling around with the intercooler, I bolted on the PS pump, GK TECH clutch fan as well as my new Mishimoto radiator. The previous owner had made radiator brackets by simply drilling flat bar to hold the rad in place. I took some quick measurements and made a quick design in Solidworks.

                        Friday (today) was my last day at the office (READ: last day to play with the equipment) so I quickly programmed and cut out some brackets. Turns out our vendor managed hardware coincidently has the perfect sized grommet. They fit perfectly! and will be powdercoated along with all the intercooler piping when its ready. I am seriously thinking of getting a smaller router table to run small jobs. I think its worth the initial investment and would easily pay for itself in a year or so.


                        Thats all for now, I start at the new place on Wednesday so I have some time to work on the car over the long weekend. I might aim to have the rear seat delete finished and upholstered, but we shall see.

                        -Jordie
                        Jordie Lewis
                        1993 Skyline Type M

                        Comment


                        • Im dyingggg please updateee

                          Comment


                          • Originally posted by SkylineCris View Post
                            Im dyingggg please updateee
                            So I've stalled a bit on the interior as I have been working on getting the Intercooler sorted and simplifying the wiring harness. Its been extremely hot and doing work inside the car is awful.


                            I mocked up the all the cutouts for the seat delete compartments, I really need to have this piece cut out on the router table as there are to many imperfections (in my eyes anyways 
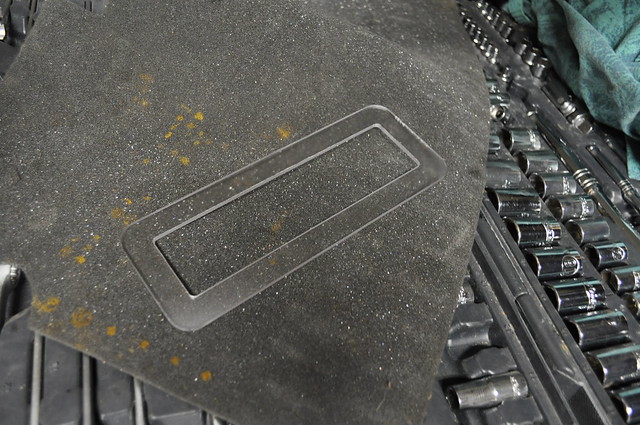
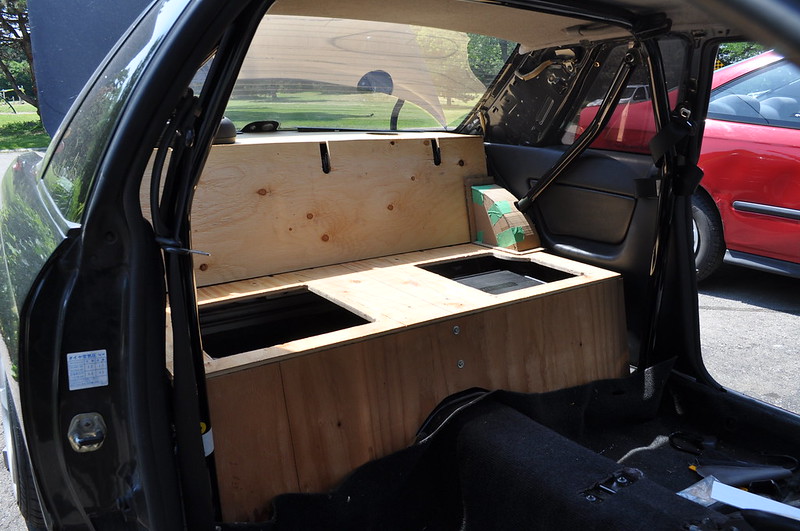
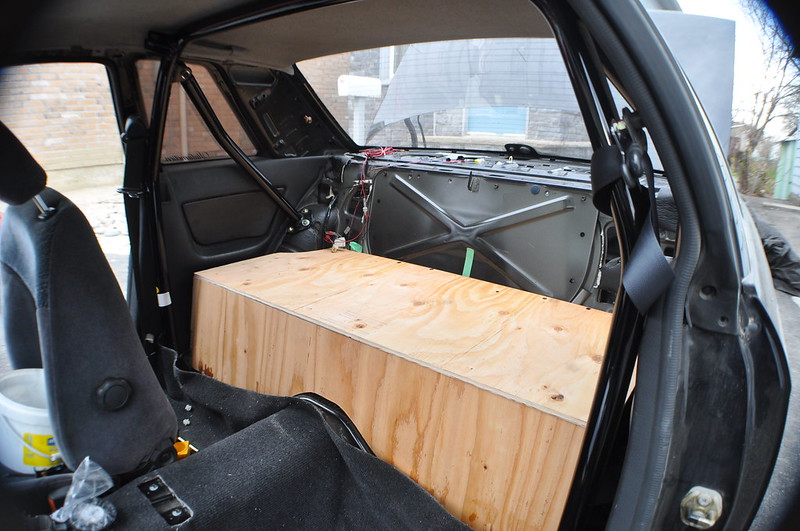
) The rear wheel wells also looked less than stellar so I mocked up a cover piece from cardboard which will be made out of plastic eventually. Its not a priority and like I said, far too hot to work on the interior right now.

                            In order to fit the bumper over the intercooler, I needed to trim down the N1 vents I had previously glassed into place.

                            I trimmed off 3/4" from each of the ducts and the bumper fit perfectly. I have yet to make a small plate that sandwiches the bumper between the rebar to prevent the bumper from bowing.


                            I saved the sprayer from the rear window delete and it just fit perfectly in an existing hole in the bumper in front of the intercooler. I have a reservoir from a BMW which will get mounted under the rear seat delete and hopefully help cool intake temps. This is a 100% unnecessary mod but the devil is in the details.


                            Got all the wiring labeled and am now in the process of re locating the fuse/ relay box to inside the car. The only wires coming into the bay on the chassis harness are the headlights, turn signals, horn and ambient air temp sensor.


                            My Tommy Kaira wheels showed up today. I had the pair of 17's already but wanted a full set and came across a set of 4 in GTR sizes (18x9+24) and jumped on them. One has a bend and will have to be repaired but when buying rare parts sometimes you have to take what you can get. I won the auction for $221 dollars so i'm not really bothered.


                            Fitment is on point, I will probably need to pull the fenders a bit to fit a square tire setup. None of that hellaflush stretched tire garbage here :P


                            More updates to come...

                            Jordie
                            Jordie Lewis
                            1993 Skyline Type M

                            Comment


                            • Holy balls, that rear window sprayer on the IC is a great idea. You gonna get a pump to feed it enough pressure?

                              Comment


                              • i like this build. keep it coming!
                                RB25 Powered RWD GT-R

                                Owner for Turtle Garage Hicas Delete Systems

                                Comment

                                Working...
                                X