Announcement

Collapse
No announcement yet.

RB26 Rebuild

Collapse
X
 
  • Filter
  • Time
  • Show
Clear All
new posts

  • You're welcome. Earth it at the HICAS ECU plug (consult a auto electrician who can tell you the proper way to do it). Earthing at the HICAS ECU plug works the same way as earthing the cat overheat sensor itself to exhaust to turn the cat overheat warning light off on the dash.

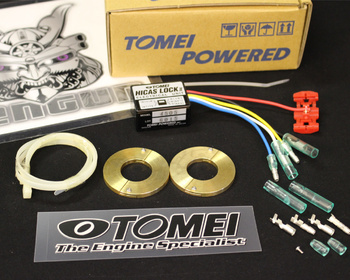
    Tomei sells a HICAS lockout kit with a loom that earths the pinouts / wiring on HICAS ECU plug to turn the warning lights off on dash -

    The Tomei HICAS lock eliminates both electrically and physically the HICAS system.


    From what I understand, it works on length of piping (research hydraulics and when additional cooling is needed), so when there is longer piping you need a powersteering cooler. Nismo sell a tube n fin powersteering cooler for 350Z? that should work on most Nissan's (seen it installed on a R35 GTR). HKS and other tuners sell plate and fin powersteering coolers.
    Last edited by Skym; 07-23-2014, 10:38 PM.
    RESPONSE MONSTER

    The most epic signature ever "epic".

    Comment


    • Picked up a large compressor from a friend he upgraded to a larger Devair unit (his old one couldnt keep up with his 3/4 air impact gun) geeze the problems people have lol, I also purchased a gravity feed style paint spray gun and a smaller touch up style top feed gun in a mastercraft kit... i'm new to painting so i'll start there. Borrowing an enclosed sandblasting box the kind with the rubber gloves you use... got a quote for getting my DS door painted (i damaged the old one a long time ago... long story, another time) approx. $350 if i strip the door, sounds pricey but may still do it (black door isnt working for me on my kh2 car). Have to run 220 out to the shop for the compressor and my old mans really old miller stick welder. wrote out a large list of things to do before wheel alignment and WOW is that list long... very daunting... i will post the list aswell as some new pictures tomorrow the storm is fierce out there right now.

      Comment


      • Got 220 power from the house to the compressor and got it fired up. Now just installing outlets for power and running wire from the box to them. Still waiting on the sandblaster box from a friend.

        Need to get moving on this project time is running out for summer, the goal is to at least have it on the road for a month this year i hope i can accomplish that.

        Comment


        • Finally got some more pictures...


          Car as it sits now... got off the front bumper to straighten the intercooler and ended up cleaning a bunch of stuff up


          One wheelwell scrubs and cleaned... still looks dirty lol... its getting an undercoating


          otherside


          engine as it sits very sad and apart


          all the wheelwell plastic slash guards... cleaned them up after this pic


          gave the bumper a scrub going to try and paint it... it wont be perfectly colour matched but its in bad shape


          our borrowed sandblaster unit... it did some good work to the exhaust heat shields ill take some pics of that another day


          rear subframe brackets front and rear knuckles tranny cross member all scrubbed and cleaned... those knuckles have so many hard to reach places pita


          misc parts and cleaned subframes


          to do list... already cross a couple off since this photo


          gutted the rear impeller of the powersteering pump... i asked in a different thread but did i need to take out the entire round impeller piece or just the fins... i can still removed the ps pump and put it back in but it would be good to know sooner then later...


          most annoying solenoid to remove ever under everything on the intake side major pita...


          thats where the soleniod used to live under all that crap


          enine bay


          intercooler hardpipes i picked up forever ago finally polished them up with 220 then 600 then 1000 then autosol... so much effort wow... obviously one is done and the other is before i did anything to it...

          Comment


          • Very awesome! Sad that it's all apart but it's for a good cause. I'm been in a similar stage (due to no engine in 3 years) so I've been doing what you're doing. Keep it up!

            Just remember, prep work makes for good work. The more your clean and degrease before you paint the better.
            No build thread.
            1991 nissan
            El terror

            "Built not bought" sooner or later = "broken not running"

            Comment


            • Thanks Bruizer! I agree about the degreasing and whatnot I had to re - sandblast some parts and re-prime because of this... but now all parts have a coat of primer and look good... the subframes may receive another coat then today is final coat day because winter is coming and the forecast says its getting colder by the day around here...

              So ill snap some photos of the primed parts and after they get coated with the final colour.

              Still waiting on my whiteline parts and a couple other small things and once they r in ill be reassembling everything

              Comment


              • Ive been posting this morning regarding the position of the subframe bushings on the rear subframe... can anyone tell me which part bushing go where... i have nismo subframe bushings part numbers 55442-RS520 and 55440-RS520

                Comment


                • some progress yesterday and some new parts in
                  Coilovers, ball joints and hks filter


                  subframe hanger


                  primed subframes ready for paint


                  more parts ready for paint


                  Painting supplies and new gun


                  rear subframe brace


                  close up of paint


                  More painting to do... this went well so i may try and paint the front bumper cause its in bad shape... wont be a perfect colour match but its flaked so badly i dont think it could be worse...

                  Ordered the proper subframe bushings so ill be selling the others i have shortly

                  Comment


                  • Nice build +1
                    1992 BNR32 Skyline
                    285hp / 220tq @ 15.5PSI On Mustang Dyno 2014-09-22


                    Current Build:
                    Precision 6264 Turbo 1.00A/R
                    Tomei PonCam Type B
                    Manley Titanium Valvetrain
                    CP Pistons / Manley Rods
                    Supertec Spline Drive Oil Gears/Drive
                    N1 water pump / N1 Oil Pump
                    Haltech Platnium Pro
                    AEM Water/Menthanol
                    Tomei FPR
                    Exedy Hyper Twin Clutch

                    May 9th, 2015 made 408whp @ 9PSI


                    Build Thread
                    http://forums.gtrcanada.com/gt-r-project-cars/62483-project-modworks-monster-r32-gtr-16.html

                    Comment


                    • spent a little time on the weekend cleaning up some exhaust heat shields then painting them with VHT the baking them in our shop oven... will post some pics after work of the parts done... they turned out good done in silver.

                      had some time to clean up the shop and get the painted subframes and other misc parts out of the shed where they were hanging. bought a mastercraft shelving unit from Cantire and set that up now its full of parts we will be picking up another unit to fill up as well. It's getting tight in the tent shop had to move some stuff around and move the rims and tires into the basement to free up some space...

                      we are going to start reinstalling the front subframe this week and get everything bolted up and ready to rock on the front end, only thing missing for the front is whiteline swaybar and end links i have all other front subframe parts so we should be good...

                      now waiting on rear subframe nismo bushings which are ordered and paid for as of friday, when they arrive the rear will be bolted up and good to go. Also waiting on the 4 small round bushings for the transmission cross member one was broken so i ordered all 4 to replace them. Still a long way to go but progress is progress.

                      Comment


                      • Finished cleaning up some minor surface rust underneath the car, primed and re-undercoated the whole underside and all wheel wells of the car... now for the front subframe...

                        Comment


                        • Great build. Subscribed.

                          Comment


                          • All 4 Rotors have been sandblasted and the hats have been VHT Silver painted and baked... pics to come

                            Comment


                            • yay new pics

                              Rotors


                              New Whiteline parts arrived


                              Close up of whiteline packages


                              Random workbench shot... little messy


                              Parts Shelves


                              Re-undercoating pic


                              Another


                              Rear


                              Back to front underside pic


                              Nice pic of the vht silver front heat shield


                              Rear heat shield


                              Close up of front heat shield

                              Comment


                              • enjoy

                                Comment

                                Working...
                                X