Announcement

Collapse
No announcement yet.

Work Log: R33 GT-R

Collapse
X
 
  • Filter
  • Time
  • Show
Clear All
new posts

  • I have many updates but haven't had the time to compile much of it. I did manage to make it out to Castrol Raceway with my buddy and his white V-Spec for open lapping which was a blast. The car is super laggy but it corners oh so well even with the crappy shocks.

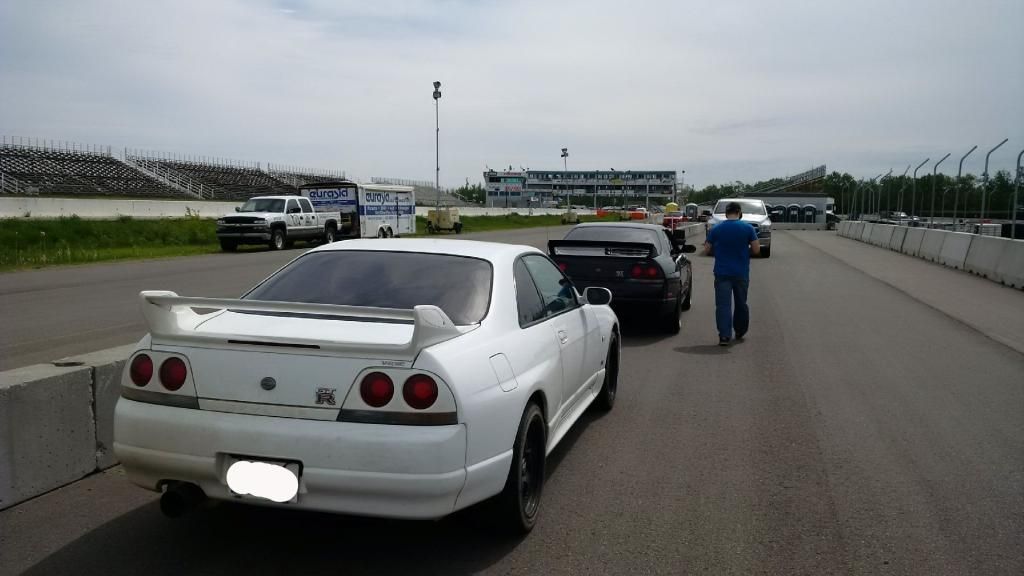
    Here we are in pit lane


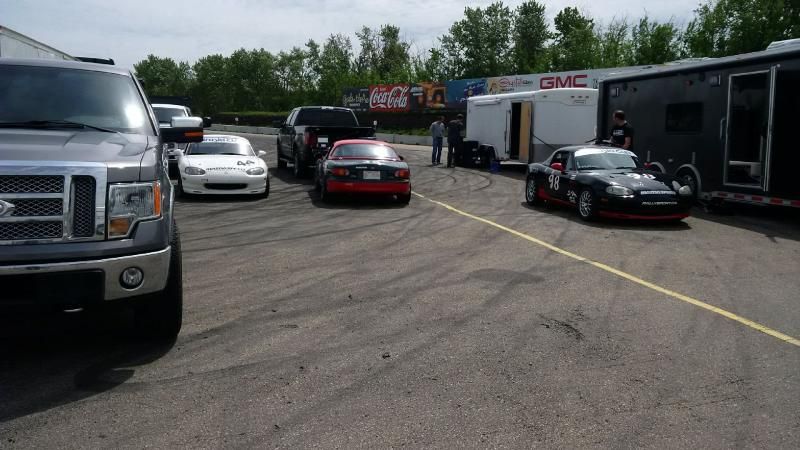
    Here were some of the others in different groups, several Spec Miatas and one GT3 cup car


    Here is a brief video my buddy put together from our Go-Pro footage. You can see how laggy my car is coming out of the left hander in 3rd on to the straight, where my buddy and also the Evo put some big distance between me. Please excuse the crappy driving, it was my first time out!

    Store your photos and videos online with secure storage from Photobucket. Available on iOS, Android and desktop. Securely backup your memories and sign up today!


    Also managed to make it down to Cochrane where my fuel line promptly burst. But NAPA was only a short walk away!


    Tune in 2 weeks! Oh and the epoxy we used to run the hardwire through the fuel top plate; it didn't hold, so please don't try this yourself. I'm rushing to find some spare Nissan connectors to reuse so the seal is maintained. Also rushing to finish swapping to a 6boost manifold with a single wastegate, installing a clutch swttch and ECU regulated 3 port boost solenoid, and running a relay for the A-LSD pump to allow the ECU to take control of its functions.

    Sent from my Nexus 7 using Tapatalk 2
    Last edited by PurpleStreak; 07-17-2014, 01:53 AM.

    Comment


    • Cool update! I didn't notice too much lag but some of the single turbo guys would maybe say you're int he wrong gear.

      Looks like a nice track anyway. I'd like to take the TDI on it and see how it does, I feel the torque but runs out of steam about 3500rpm.

      Did you want a 4 port solenoid instead? so you can run a dual port waste gate canister for more boost. Hope you get at least 550whp! While you're down there, maybe they'll show you my lump lol, I haven't seen it since it was assembled a few weeks ago. Starting on the head now. Should be running by next year.

      How much was the castrol day?
      No build thread.
      1991 nissan
      El terror

      "Built not bought" sooner or later = "broken not running"

      Comment


      • Originally posted by Bruizer View Post
        Cool update! I didn't notice too much lag but some of the single turbo guys would maybe say you're int he wrong gear.

        Looks like a nice track anyway. I'd like to take the TDI on it and see how it does, I feel the torque but runs out of steam about 3500rpm.

        Did you want a 4 port solenoid instead? so you can run a dual port waste gate canister for more boost. Hope you get at least 550whp! While you're down there, maybe they'll show you my lump lol, I haven't seen it since it was assembled a few weeks ago. Starting on the head now. Should be running by next year.

        How much was the castrol day?
        I guess I should be in the 2nd gear for those laggy corners; I didn't quite figure out the best gears to be in for each corner yet, I'm planning on going again on Aug 22nd, you should try and come; theres all kinds of cars there and Im sure it would still be a blast! It was 400$ including 100$ for being a rookie, I think weekdays are a 100$ cheaper; more info on www.trackjunkies.ca

        I'm going to try out the 3 port solenoid I have and see how well it regulates boost. I'm only going for 19-20 psi so it should be fine. I'll ask about your motor
        Last edited by PurpleStreak; 07-28-2014, 10:17 AM.

        Comment


        • 6boost twin scroll manifold w/ single wastegate install

          So before I had mentioned switching manifolds, from the 6boost with twin MV-S wastegates to the 6boost with the single V60 wastegate. Nothing really wrong with the original, its just a little tighter than I would like and I'm all about making things simpler.

          Here I am changing the springs on the V60, you have to find a better clamping solution than this or its going to fly apart.


          I went with the large blue/small green combo, which is a spring pressure of 14.11 psi. This is the best way to compress the wastegate I found.


          Here is the old guy still in place. Its a bit discolored especially around the collector but still 100% functional. The manifold, wastegates and dump tubes (which I didnt install) are for sale BTW.


          Old vs new; I opted for the black ceramic coat this time


          Installed, this time I (sort of) have room for a dump tube


          Now with the taller wastegate, my downpipe did not clear it. So a little bit of modification was required to the downpipe. Those are my crappy welds, btw, but out of sight, out of mind


          New V-band flange and flex pipe installed at the downstream end to aid ease in install, and fresh wrap installed. The zip ties are temporary

          Comment


          • Fuel Pump Episode 3

            Here we go again, back to fix the fuel leak that I caused. I decided to eliminate the hard wiring going into the tank, and just utilize the stock wiring setup for inside the tank.

            Pick up this tool guys, its a unviersal tool for fuel cap rings removal and works a treat and much cheaper than the OEM special tool and beats beating on it with a screwdriver and hammer.


            You want to engage the pump bracket in the two slots in the hanger and engage the clip on the bracket in the appropriate hole above the second slot on the right. When you do this the pump will click in place and move up and down with only a small amoutn of play.


            And to replace my butchered parts, I swapped it with S14 components which are exactly the same (the GTR cap pictured is my friends who I stole the fuel pump wiring from)


            Just swap the plastic piece over


            Here is the pump sitting properly (its a lot easier to do this with the cap off)


            All that's left is to wire the solenoid and clutch switch in, and change the fluids.

            I also installed a 340mm wheel and a cup holder. Not the best looking placement for the cupholder but there is no other place to put it and it is actually a very functional location.


            Comment


            • Dude! That is one of the worst things I've seen done to a Skyline! A cupholder screwed to the door panel?!? There's a reason why these cars don't have cruise control and heated seats. If you need a cup holder in your car you're driving it wrong.
              I respect the work you did until this.

              Comment


              • Nismo Quick Shift

                So I had to leave my car with Vex, initially they found a boost leak at the vac hose going to the OEM boost gauge which they fixed, then while on the dyno as soon as we went over 14 psi, the car started misfiring at higher RPMs. Due to time constraints, I had to leave it there, as I have to source new coilpacks and a wiring harness. It could be the plugs too I suppose, but unfortunately there was no time left in that day to troubleshoot.

                In the mean time I can write about my install of the Nismo Quick Shift with the Cusco bronze bushing. I always felt the throws on this car were too long for a sports car so it had to be done. The Nismo kit has come down in price quite a bit as well.

                Here is the stock throw. Sorry for the crappy quality.


                Picked up the shifter and bushing from Adam @ Feast.


                Here are the individual components, all very nice as expected from Nismo.


                OEM vs Cusco Bushing


                Bushing installs just as easily as OEM with a couple of love taps.


                The goal of the quick shift is to raise the fulcrum point of the shifter, reducing the travel of the upper section of the shifter while maintaining the travel of the lower section.


                The plastic part with the pins needs to be removed from the transmission (will call this the pivot). To do this, the shifter needs to be removed by pulling the snap ring, and then the retaining ring which holds this pivot can be pulled.


                The provided spacer is then put in the transmission, and the stock wavy washer is put on top. The pivot is then placed on top.


                Congrats, you no longer have to deal with the retaining ring and snap ring. You now get a beautiful bracket that clamps onto the groove in the transmission boss and serves to clamp down the entire assembly. THe instructions appear to indicate orientation in this manner is important.


                Place the provided gaskets in the respective positions


                Then the shifter goes in the hole. I might take a little while to position the bushing perfectly for insertion into the shift fork, but it will go in eventually.


                THe top plate is then placed over the assembly and the cap screws can be threaded in and torqued to xx ft.lb (will fill this in when I remember). The boot can be then slid over and zip tied.


                Reassemble the remaining bits. The insulation piece does not fit any longer, it would need to be modified to fit. Transmission noise is mroe evident with only one of the two pieces in place.


                Throw of the quick shift: It feels much better, and the bushing makes a world of difference, making the whole shift action feel very precise. I think the C's shift kit mimics this design as well. I believe the BNR32/BCNR33 shifters are different from the other transmissions. Of course, the BNR34 shifter is different as well.

                Comment


                • At long last I am happy to share with you the final numbers.


                  Sent from my Nexus 7 using Tapatalk 2
                  Last edited by PurpleStreak; 09-16-2014, 02:58 PM.

                  Comment


                  • Very nice shifter mod!

                    I thought of that too but I'll wait and see what the box drives like before changing stuff. Grats on the power down
                    No build thread.
                    1991 nissan
                    El terror

                    "Built not bought" sooner or later = "broken not running"

                    Comment


                    • Do you know what material the shifter is? does the height of the knob change?
                      oh hai!

                      Comment


                      • Originally posted by Bruizer View Post
                        Very nice shifter mod!

                        I thought of that too but I'll wait and see what the box drives like before changing stuff. Grats on the power down
                        Thank you! Yeah definetely get used to what you have first. I found the stock one far too sloppy for my liking, maybe the bushing is all it takes.

                        Originally posted by Black BNR32 View Post
                        Do you know what material the shifter is? does the height of the knob change?
                        I do not know what material it is, it does have some urethane fill though. As you can see below, the height of the knob does not change.

                        Comment


                        • FYI this is what two step did to my solid copper T4 gasket


                          The nuts kept coming loose; I was heading back home that day so I had to come up with a quick fix. I put some Teflon tape on the threads (fully knowing Teflon can't heandle these temperatures) and didn't have any threadlocker; and also used some lockwashers. So far the assembly is holding tight, hwoever I am getting the correct copper clad lock nuts meant for this application.

                          Comment


                          • What size wastegate and exhaust?
                            oh hai!

                            Comment


                            • I also melted all my wires from the two step, wraped them in heat wrap since

                              Comment

                              Working...
                              X