Announcement

Collapse
No announcement yet.

Nelsonmxmarc 1993 GTSt Type-M Build / Tips-tricks for HCR32 (Skyleezy!)

Collapse
X
 
  • Filter
  • Time
  • Show
Clear All
new posts

  • #16
    thats lookin real good man,

    sorry i woke up late this morning i coulda helped you with the bellhousing! lol...
    next weekend should be better tho as i don't work friday i think...

    i think your car is shaping up to be one of the nicest GTS-T's on the road this summer man.. lotta good workin going on here.
    The SkyLife Community & News Website --> http://www.skylife4ever.com

    Comment


    • #17
      I like.

      Rear crank oil seal failure is common (same with front crank oil seal). Rear oil seal should be changed when clutch is changed.

      RB20DET actuator is around 11-12psi when bench tested.

      Get a piece of vacuum hose with boost gauge T'd in and connect to wastegate actuator bulb. Then apply compressed air and note on boost gauge when wastegate actuator moves the arm. Around 11-12psi is healthy for RB20DET actuator.

      Also aircon pump can fail on inside, as the balljoints under the 5 or so pistons and balljoints on the disc that pistons are connected to can seize due to lack of oil. I noticed this when aircon pump was rebuilt (didn't know the history of servicing aircon pump). Also shims can wear out.
      RESPONSE MONSTER

      The most epic signature ever "epic".

      Comment


      • #18
        sorry i woke up late this morning
        I think 'late' is an understatement, it was like 4 pm when you called me lmao.
        Thanks man, really appreciate it! If all goes well and it runs as well as i think it will, i hope to see 350whp with a lean track setup.. 320 ish streetwise... We can tinker with nistune this summer and try a few diff maps!

        On behalf of the din gauge setup, it's all good Josh, just get me those measurements and let me know exactly what colour you want, etc.. Even weave direction can be altered. Once you hit me up with exactly what you wanna do, i'll lay it up!

        Skym, thanks!
        You're right about the actuator; i assumed 12 to my best knowledge but had heard different stories in terms of actual PSI, most people pointed @ 10 however probably just due to a weak actuator spring or leaky boost gauge.. I'd like to fit a test to see what it could hold, but like you said, more or less 12 lbs.

        seize due to lack of oil.
        Lack of oil as in due to leaky or poor freon levels? Or is there some sort of internal sump in these pumps? I've never taken one apart thus have no real idea as to what's inside, besides what i've acquired from pics and such floating around the web.

        And the oil seal was decent - i mean i could have changed it had i been real picky but the oil moisture down there was primarily from the rear of my cam cover seals, the 'half moon' bits. They were hard as rock and provided zero seal.. All changed now though!

        Next season i plan to do a complete rebuild of the motor, so then will be a good time to tackle that..
        Check out the GTST Projects page and keep up to date with my build!
        www.nelsonmx.wordpress.com
        Like us on Facebook! www.facebook.com/NelsonMX
        Any part inquiries can be forwarded to marc@nelsonmx.com

        Comment


        • #19
          -------------------------------------------------------------------------------------

          Today was decent - managed to get front bumper and rebar cut for the Godspeed intercooler..

          Having a bit of trouble with the intercooler setup with the piping given, but it's coming together, slowly but surely!

          Will have pics tomorrow night.

          Also working on a Ram air intake, not the typical homo hood setup either, induction via the front bumper.. This will work its way into my brake cooling system as well..

          Then possibly a carbon fibre diffuser for the front as ive removed my sump gaurd and it's looking quite naked.

          I'll also be putting up my DIY catch can install.. Flow through system - metal water bottle, steel whool, the works for under 12$.

          So ya! Stay tuned
          Check out the GTST Projects page and keep up to date with my build!
          www.nelsonmx.wordpress.com
          Like us on Facebook! www.facebook.com/NelsonMX
          Any part inquiries can be forwarded to marc@nelsonmx.com

          Comment


          • #20
            There is a area around piston assembly, where oil can sit. Leaky oil seal can make aircon pump fail, as I think oil leaks out with gas.

            When you regas the aircon you add oil (like you do with a engine that has pistons) + gas. Oil + gas should be changed every year and bottle infront of radiator changed every 2x years. Also blowing the system out with I think was nitrogen?? or something like that to clean aircon core, etc.

            R32 Skyline aircon pump is made up of the front section with electromagnet (as you already know) that when engaged, turns the shaft with roller bearings, which drives a section that oscilates disc (from memory the centre part of section that oscillates disc has shims) which drives 5 x or so engine like pistons that are connected by 5x shaft's (ball joints on both ends of shaft's) that pump the gas. Also there are seals you replace.

            I kept the piston assembly (disc + 5x pistons) that was replaced with aircon pump piston assembly from another models aircon pump, due to seized balljoints (aircon pump was making knocking sound due to worn balljoints on those pistons), but stunk so much of the old gas they used at factory, so got rid of it safely. I was going to take photo's of it and share them.

            The piston assembly is not available from Nissan, so have to buy the whole section of pump to get piston assembly and is expensive hence using another second hand aircon pump piston assembly that was in good condition.
            RESPONSE MONSTER

            The most epic signature ever "epic".

            Comment


            • #21
              looking forward that DIY catch can install, as i'll need it

              and if your thinking about fabricating a carbon fiber front diffuser, dude i want in
              if you can make it work, i'll just have to drop you some cash
              sigpic

              [links to all chapters in first post]

              Comment


              • #22
                i like that FMIC. where did you get it?

                Comment


                • #23
                  looking good man. Going to be a nice build when your all done!!

                  Comment


                  • #24
                    Love boost - FMIC came from the good guy below you, BryanV8.
                    Hit him up! 25% off man! Easy to hook up, however im having a sh*t fit with my bumper not clearing.. Damn GTS bumper, not even a type M lol.
                    Check out the GTST Projects page and keep up to date with my build!
                    www.nelsonmx.wordpress.com
                    Like us on Facebook! www.facebook.com/NelsonMX
                    Any part inquiries can be forwarded to marc@nelsonmx.com

                    Comment


                    • #25
                      Originally posted by nelsonmxmarc View Post
                      Love boost - FMIC came from the good guy below you, BryanV8.
                      Hit him up! 25% off man! Easy to hook up, however im having a sh*t fit with my bumper not clearing.. Damn GTS bumper, not even a type M lol.
                      lol ya you have to cut out a good 4" at least when converting to front mount, Take lots of pics of the install and final product!!

                      Comment


                      • #26
                        ohhhh now you tellll meeeee lol :P
                        Check out the GTST Projects page and keep up to date with my build!
                        www.nelsonmx.wordpress.com
                        Like us on Facebook! www.facebook.com/NelsonMX
                        Any part inquiries can be forwarded to marc@nelsonmx.com

                        Comment


                        • #27
                          lol my bad, i'll start selling my front mounts with a reminder to cut the front bumper for fitment hahaha

                          Comment


                          • #28
                            ------------------------------------------------------------------------------------

                            FMIC is on.. And i must say, it was a heck of a job.. lol

                            Much more work than i had anticipated considering it was a purpose built rb20 skyline kit, or so i thought..

                            Anyways, you need to cut out the entire tray where the charge pipes normally route to the SMIC, this does however, give more flow to your airfilter so i guess it alleviates my ram air issue lol.

                            I'll post pics of this tonight.


                            Engine is finally together though, so that's a huge plus. Going to make a make-shift plug for my inlet charge pipe (Big rubber piece of crap that maf/filter connects to) so i can check for leaks..

                            I'll follow this up with a write up tonight!.... If of course im not there all night finding leaks.. lol.
                            Check out the GTST Projects page and keep up to date with my build!
                            www.nelsonmx.wordpress.com
                            Like us on Facebook! www.facebook.com/NelsonMX
                            Any part inquiries can be forwarded to marc@nelsonmx.com

                            Comment


                            • #29
                              ------------------------------------------------------------------------------------

                              OK SO! boost leak tester is turning out to be a real PITA...

                              Here's what i put in the GTS Tech section;

                              Followed the DIY but rather than going directly from the inlet of the turbo, i went from the MAF port on the rubber inlet tubing.. Blocked off the PCV entrance and exit becuase i was getting serious blowby @ the dip stick..

                              Pressurized the whole intake side with my compressor at work, which has no hand held reading device, so i put the valve to approx 25 lbs and began to pump..

                              found a few leaks here and there, most typically the IACV to J-pipe, T fitting and the 2 lines i blocked off on the plenum (that were there originally from the charcoal canister).. Changed the plenum gasket so im hoping there's no leak there but i couldn't see, and the AACV gasket has been changed but there is a ever so slight leak.. Anyways, ive been having to use a constant supply of air to find these leaks as the pressure DOESN'T hold?

                              My main question is this; am i doing things right by the looks of the pictures? Because my system holds 0 air? Lol

                              I know the picture shows my charge pipe to J-pipe blocked off, it is. However it wasn't in the first attempts, but either way i do it, i can't retain pressure whatsoever..

                              Ideas?


                              Thanks guys!


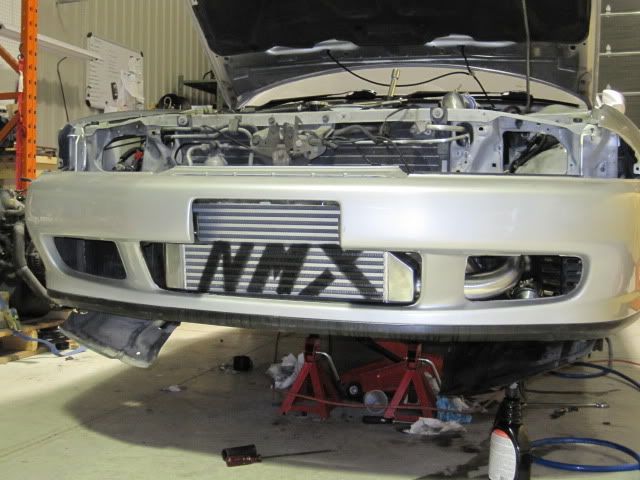
                              Oh and this is what the intercooler looks like with a GTS (not type m) bumper..


                              Yes, im a douche for putting my own company logo on something that doesn't belong to me .. HOWEVER, im not a big fan of stickers, so i figured why not.. and it was nude.


                              Anyways, still looking for an answer.. But that's basically how my engine, fmic sits right now..

                              If i can figure out all my little leaks or what not by tomorrow, the bellhousing could potentially be replaced depending on who's around, followed by oil change, diff oil change and tightening of the AC compressor belt.......

                              And then it's done

                              JOKES.. Not really done, but the build process and things i NEEDED complete are finished.. Still working on a ram air; debating using hard piping to get it tucked in behind my FMIC piping, or to use a scoop like i had first envisioned... Either way, it will be done..

                              Still need a Z32 maf.... lol FML

                              .. still working on my chibi wing and front diffuser; should see results later next month as im tied up with a few things right now!
                              Check out the GTST Projects page and keep up to date with my build!
                              www.nelsonmx.wordpress.com
                              Like us on Facebook! www.facebook.com/NelsonMX
                              Any part inquiries can be forwarded to marc@nelsonmx.com

                              Comment


                              • #30
                                hrmm... not sure what the deal is with your pressure tester... except one thing dude... are you somehow accounting for the fact that intake and exhaust valves could be open?...like from the looks of things you put in pressure where exactly?... and it goes into the intake manifold you say... so then i would assume its also allowing air into the combustion chamber... which for sure would not hold air if even one cylinder has open valves...

                                don't valves have overlap in the cam cycle? so wouldnt that explain why your not hold air?...
                                The SkyLife Community & News Website --> http://www.skylife4ever.com

                                Comment

                                Working...
                                X