Announcement

Collapse
No announcement yet.

Nelsonmxmarc 1993 GTSt Type-M Build / Tips-tricks for HCR32 (Skyleezy!)

Collapse
X
 
  • Filter
  • Time
  • Show
Clear All
new posts

  • ...Sr20's are reknowned for blowing up though...lol but i would guess that this you'd be talking about a built SR20... ?

    I'd have to agree that A/M parts are far more readily available for SR's than RB20's... but the RB is an RB soooo...lol
    The SkyLife Community & News Website --> http://www.skylife4ever.com

    Comment


    • Driving a car with RB20DET is all about the using the correct gear. If you drop down gear, keep rpm high (engine in powerband), you can catchup in tight corners. Common technique used at Bathurst, etc to catch up to the 4cyl Cosworths in tight corners. Car with diesel engine is similar in the way you drop down gear and keep rpm high and into powerband to get the best from them. On racetrack, engine should be above 4000rpm most of the time.
      Last edited by Skym; 01-08-2011, 08:24 AM.
      RESPONSE MONSTER

      The most epic signature ever "epic".

      Comment


      • Your right Skym you should be above 4000rpm but still that low end torque makes a car easier to drive and more predictable. I love the higher rev and peak power of my gtr but still low end torque is definetely a good thing.

        I never really seen a built sr20det blow up minus the few that was driver/mechanic mistakes (disconnected fpr vacuum line was one nice failure of an sr20 @ 8000rpm that happened right infront of me, another was a badly leaking injector that the driver knew was ******, another one was the fault of the tuner who will remain nameless but he is the biggest nissan tuner in montreal).

        The only thing that an sr20 is bad for is the hydralic lifters, but tomei makes a solid lifter kit for dirt cheap. Also the new thing is to get a sr20ve head and bolt it to the sr20det along with the oil pump, the sr20ve has vvt and flows like crazy... also with some silicone the shims will stay planted even at 10,000rpm.

        Anyways this thread has become a sr20det vs rb20det debated, lets get back on topic...

        Comment


        • Engine's coming out tonight.. I also got a whack load of parts in the mail today, but only friends on the Book get the sneak peak bahah
          Going to take a family photo of the goods before they're all installed!
          Check out the GTST Projects page and keep up to date with my build!
          www.nelsonmx.wordpress.com
          Like us on Facebook! www.facebook.com/NelsonMX
          Any part inquiries can be forwarded to marc@nelsonmx.com

          Comment


          • so... I should be looking for megan coilover hen??... hummm
            Need detailing done to your car? I'm open to travel to detail your car :

            http://forums.gtrcanada.com/group-buys/54899-ontario-cobraa-detailing-group-buy.html

            Please follow my works and latest news/promotion at : https://www.facebook.com/Waxxonspa || Waxxon.com ||

            Comment


            • -------------------------------------------

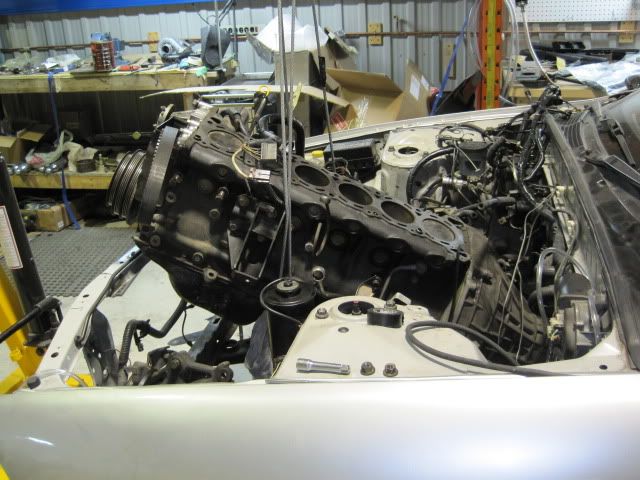
              The RB20 is out. Note i did the job with the transmission still intact.

              Relatively easy job, and considering i did it alone just over an hours time, i think anyone with the right mindset, tools and even a friend could easily achieve the same.

              One big thing to note when doing this without a lift, first and foremost, place a HYDRAULIC jack underneath your transmission bellhousing. Theres a flat area with a small step in it, good place to mount your jack.
              I emphasize on hydraulic because you'll need to play with the height of the trans as you pull it out.
              The CFG of the RB20 is rather far back; i'd say somewhere along cylinder 6.
              Since you need to pull the motor and transmission on an angle to clear the tunnel, you will have to use the jack as support as to not destroy or snag on your power steering rack/subframe. Also, the jack is required to drop the transmission/engine mounts off the rear.
              A good note is that there are only 3 mounts on an RB20. 2 at the front by cylinder 2, and 1 at the rear at the end of the trans.
              Easiest way to keep most of the bottom end intact is to undo the driveshaft carrier which will allow the driveshaft to slide out the end of the input shaft on the transmission.
              Now all that's left is to make sure there are no connected hoses and wires, then begin to loop your chains/ropes/cables onto your block and attach them securely to your lift.
              Once that's done, loosen your mounts at the front - 4 14mm nuts on either side of the mounting plate. (not necessary to remove the bottom 2 but makes it easier instead of getting cocked on the studs)
              Now begin to lift, watching your supports dont shift inappropriately and that the weight is being well supported.
              Use the jack to lift then lower over the front subframe/steering rack.
              Once that's clear, the jack will free up and can be discarded.
              Once it's high enough you can grab the as$ end of the transmission (coupler where the driveshaft enters) and tank it over the radiator crossmember.

              That should be it.

              The weight of an RB20 (FULL, head and all) with transmission is only 538lbs if i remember correctly. A 1 ton jack will suffice given the arm length adequate to reach inside our enormous engine bay depth.

              Here are some photos of the job along the way;


              A teaser of my new goodies How well do you know your boxes??


              After the engine was pulled, it was time for a clean up. My first thought was that i was going to need a repaint.. but..

              - Before;


              - After;


              Also did a nice wire tuck on the passenger side;


              Capacitor location;


              Now i just need to figure something out for my steering reservoir.. I deleted the remaining hicas loop-to-cooler that i couldnt reach prior to removing the motor, also a few brackets which came out to a solid 1.3 kg or so with hardware.

              Cleanup is still going on, but seeing as the paint is in amazing shape, i'll likely can the repaint idea and continue to finish tucking wires etc before finishing my motor/transmission rebuild..


              Still need info on the oil squirter bolt head size and tool name (inverted torx?) just so that i can strip my other block completely before removing it from the stand.
              Check out the GTST Projects page and keep up to date with my build!
              www.nelsonmx.wordpress.com
              Like us on Facebook! www.facebook.com/NelsonMX
              Any part inquiries can be forwarded to marc@nelsonmx.com

              Comment


              • -------------------------------------------

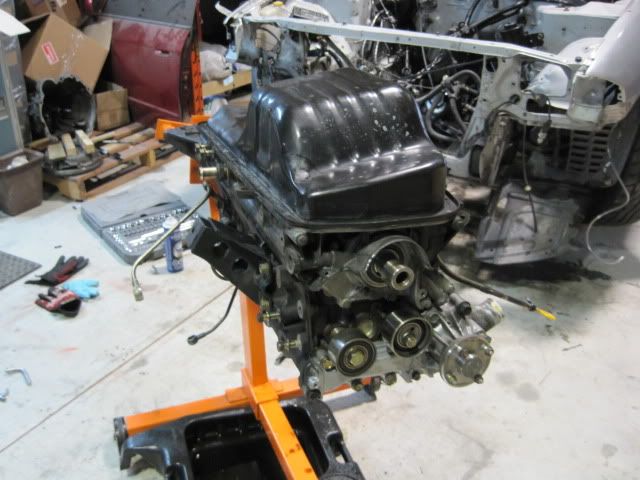
                Disassembled the motor today.
                Looks as though things aren't as bad as i had anticipated. Pistons are new and have been recently changed, thus the reasoning behind my 150-155 compression numbers. I've also revealed the cause of the mysterious cylinder #4 knick; ring compressor upon reinstallation.

                When the motor was last rebuilt (by whomever, assuming in japan because this car was imported by a friend), the ring compressor scored the top of the cylinder. Nothing was done about one for 2 reasons; 1 it was freshly line honed and the cross hatching is still vividly visible, and 2, the knick in the cylinder has zero affect on the rings ability to seal because it is nearly a millimetre HIGHER than the top ring land, meaning no ring strikes this or interferes with it at all.

                Now i'm left with another small cylinder score, nothing too bad, but caused by the removal/install of the previous job due to the con rod scraping on its exit/entry. Typical mistake, oh well..

                Going to do a light in house hone with some heavy duty scotch bright, then a lighter grade to clean it up, should get rid of all the marks minus my larger knick, but since it's not an issue i wont address it just yet..


                Being that the pistons/rods/rod bolts are all new (if you look closely at STOCK conrod bolts, they have a small indent at the base, these do not) i'm going to just throw it all back together and run it as is.

                One question i have; is it safe to REUSE Conrod nuts? The bolts are still in the rod and the bearing assembly is to spec and will remain as is, thus no change to deformation. Since this motor has an obvious refresh, and the conrod bolts look to be new, either aftermarket or new OEM, i dont see why i shouldnt be able to retorque the nuts. Its a 2 stage torque method with the latter being only 4.5 kg/m, nothing serious.. Anyone foresee any problems? Stretch limits?

                I mean yes, i could change them, but that means; remove crank, have crank polished, change bearings and tolerances altered, have crank balanced, install new conrod bolts, have them deformed and fit - by this point i'm in 600-800$, might as well spring for forged pistons, rering and go with forged conrods?.. bam 2000$ on an rb20 after proper machining, blueprinting, and reinstallation, not including gaskets and labour hours (sucked up on my end of course)...
                Let's just consider that 2000$ goes towards my 2.3 (dont need to spend 1200$ on 2 sets of pistons) or SR build for next season, as i have a big motor build planned for her come next winter.

                So for now, as far as i can see, everything has been changed and will reliably make 350+ whp for the summer, just a question of these nuts being fit for the job.

                Pictures!

                Got this off in 2 seconds, was nice a loose Sorry Adam,


                Check out the GTST Projects page and keep up to date with my build!
                www.nelsonmx.wordpress.com
                Like us on Facebook! www.facebook.com/NelsonMX
                Any part inquiries can be forwarded to marc@nelsonmx.com

                Comment


                • Also looking for a good/safe detergent to use on the block - inside (Oil galleries not so much, but the water galleries are jam packed jelly tight) and out. Something safe on the crank bearings because i wont be removing them to re-oil before installation.

                  Also need to know if those nuts are reusable
                  Check out the GTST Projects page and keep up to date with my build!
                  www.nelsonmx.wordpress.com
                  Like us on Facebook! www.facebook.com/NelsonMX
                  Any part inquiries can be forwarded to marc@nelsonmx.com

                  Comment


                  • Engine is ready for reassembly!

                    Finished cleaning the block and waterways with degreaser, than, with the thermostat out, i was able to jet enough water through the galleries to thoroughly rinse them.

                    New water pump was on already, so that will be good to go for the next season!

                    All clearances checked out - Rod journal clearances were well within spec, as well as the crank journal pin being well within as well! Rod/crank horizontal clearances were great too; absolutely no complaints. My assumptions on this motor having been rebuilt recently seem to check out which is a sigh of relief.

                    Tonight, i'll be going back to finish cleaning the head. Following up from Mcfly's post on GTRPWR, his ridiculously thorough rebuild has given me a few different directions to go with the head. I picked up some new carbide tips for my dremmel as well as some for my die grinder to tackle the larger, more heavy duty job of doing the proper gasket matching and removal of material on the exhaust manifold divider plate. All mouths and openings will be gasket matched and this should remove at minimum 3/32 of an inch of material on all manifold ports and more than double this at the manifold entrance to the turbo. The snail as well, will be gasket matched before being sent for rebuild at Cherry turbos.

                    Placing an order tomorrow night for a valve lapping kit and a valve spring compressor. I could potentially remove the originals with a socket as i'd have access to the collets without any real issue, but to replace them with the heavy duty Tomei's is going to pose an issue. So it's a safe bet to have a compressor handy..

                    Also found out that the nut/rod bolt's ARE reusable. The only reason they would no be reusable is if; A. You remove the rod bolt from the rod, B. You change to an oversize bearing (0 vs 1 Sizing) because this will affect the deformation pattern of the bolts, being paired already to a different sized race. Even if there clearances are off a thou, it's not worth reusing, this will just introduce unnecessary stress to the bolts and likely wind up sheering under high load.

                    Con rod bolts are not necessarily stretch bolts by any means. The general thought is, these bolts stretch when first torqued, thus are no longer reusable. This is wrong, these bolts do not stretch, as a matter of fact, then torque numbers are incredibly low at 4.5kg/m. The one thing you need to be aware of is deformation which is the actual, physical 'bending' of the bolt inward to cater to the size of the crank pin (where the rod end connects). Same typical principle applies to head stud bolts. They dont necessarily stretch, but if you swap headgasket, to crush the headgasket in the same manner the previous one was squashed, you will need to apply considerably more force, this leads to fatigue issues in the future creating a possible sheer at high temps and high rpm as pressure increases. Potentially you could reuse stock bolts if you reused the same headgasket and tolerances weren't changed, unless otherwise specified..
                    Check out the GTST Projects page and keep up to date with my build!
                    www.nelsonmx.wordpress.com
                    Like us on Facebook! www.facebook.com/NelsonMX
                    Any part inquiries can be forwarded to marc@nelsonmx.com

                    Comment


                    • Looks like its going good. For the con-rod studs, you don't want to switch to ARP bolts? They are around 180$ or less for rb26, I'm sure they are the same for rb20. You probably won't need them none the less, just extra safety. It looks like you got off the Crank sprocket easily, mine was seized on took a torch, 2 4-foot pry bars, and 15 minutes to get it off.

                      Your engine bay is so clean....!!! When you working on your engine again? My buddy has a valve spring compressor and the inverted torx if you need, I can probably swing by sometime this week. Let me know, you got my cell.

                      I can proabably get your engine acid dipped and honed this week for like 120-150$ if you want.
                      Last edited by mitch32; 01-17-2011, 02:32 AM.

                      Comment


                      • I've seen mechanics change shells in a Jeep conrod and had no problems afterwards (not changing oil caused the shell failure). I would think if you fitted a new, same thickness shells it would need to be bed in. Also it would make tolerances tighter. Stock shells seem to be softer, so should wear the surface of shells more than the crank. But I guess it also depends on km engine has done since rebuild and how it's been driven.
                        Last edited by Skym; 01-17-2011, 03:08 AM.
                        RESPONSE MONSTER

                        The most epic signature ever "epic".

                        Comment


                        • Mitch;
                          Was going to change studs but that meant having to pull the crank AND change journals as well since the new bolts would have to be deformed to the crank pin, and no point in doing that with older journals. The thing is, i checked out all the tolerances, all journals, pin, conrod diameter and etc are all WELL within spec, like i said, they're all brand new from what i can see..
                          Wow that's a great price.. Won't need it now though Will certainly take you up on it next winter when i do the 23! I cleaned the block with degreaser, and the water galleries with the same as well as brake clean etc, then rinsed them out with water.. Just need to clean the outside which is drenched in degreaser at the moment then give'r a paint!
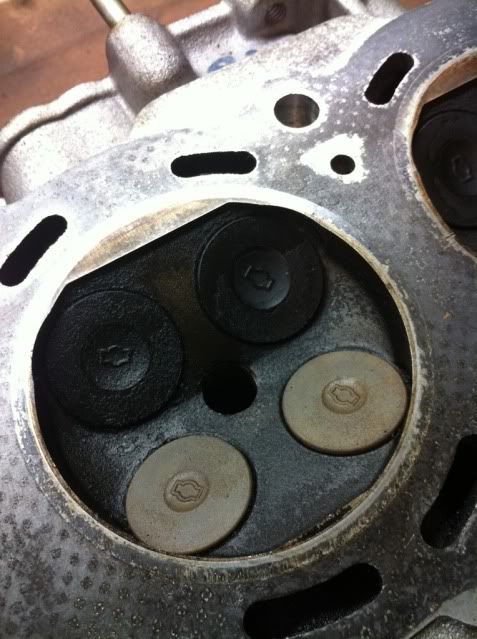
                          Need a ring compressor to get my piston back in but i should have that tomorrow. And as for the valve spring tool, i'll be buying one anyways as i'll likely need it again at some time, but thanks man! That tool, i found out, is a 12 point inverted bit. Strange tool to use, but if anyones familiar with their turbo, its the same crown nut on the compressor wheel side.

                          Skym,
                          Right exactly! as soon as the tolerances are altered slightly, the bolts cannot be reused. Shells (journals) should last, considering there is clean oil and heat is kept to a minimum. RB20's worst environment is track use, and as you've said countless times, the lack of a oil cooler makes lapping this car/motor very strenuous on the internals. You can see signatures of heat saturation on the bearings, which i'd assume to some degree is common, but hopefully the oil cooler will keep any new damage to a minimum!


                          ---------------------------------------

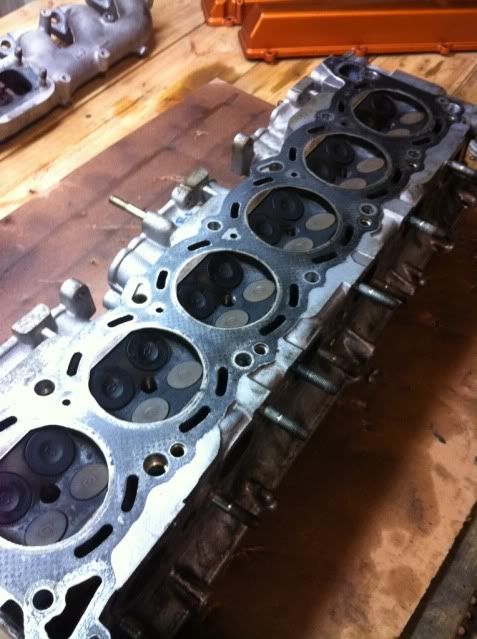
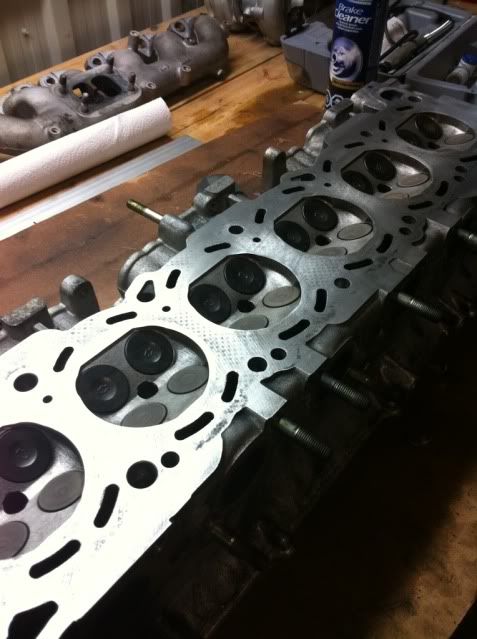
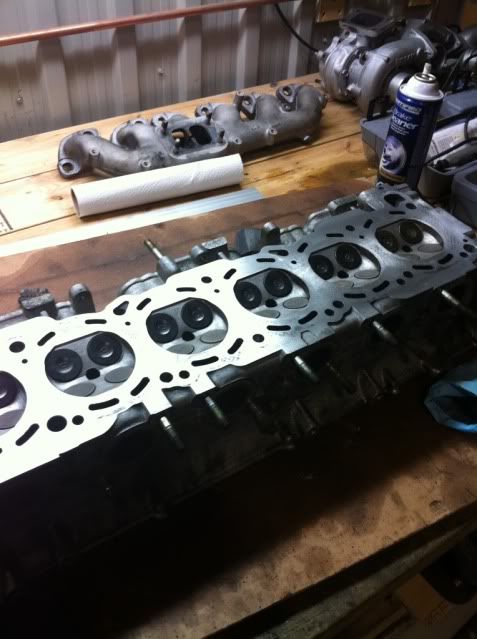
                          Head cleaning and gasket matching;


                          Finished cleaning the underside of the head last night in preparation of removing the valves.
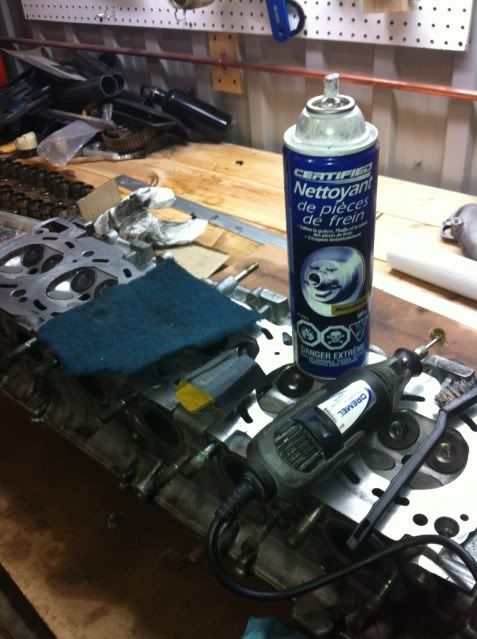
                          One thing to note is to do this cleaning process before removing the valves that way you wont damage the seats when cleaning afterwards! IF the seats become scratched or damaged it could result in a leak, otherwise you'll need the head shipped to a machinist who can replace the seats.

                          Tools you'll need;
                          Degreaser or oven cleaner
                          BRONZE brush or dremmel bit
                          Air gun or good lungs

                          Give the head a good spray down with degreaser and let sit for a while, then begin the process of removing all the gunk..


                          The result;


                          To 'deck' the block and the head, start first with a blade to scrape off the excess junk, then move to green scotch brite as its quite abrasive, then from there to a light 400 grit sandpaper. That way you can ensure the block and head is nice and smooth.

                          Next, take a ruler or the straightest edge you have, and lay it flat on the top to check for high spots or warping. Try it on different angles until you can be sure its flat..


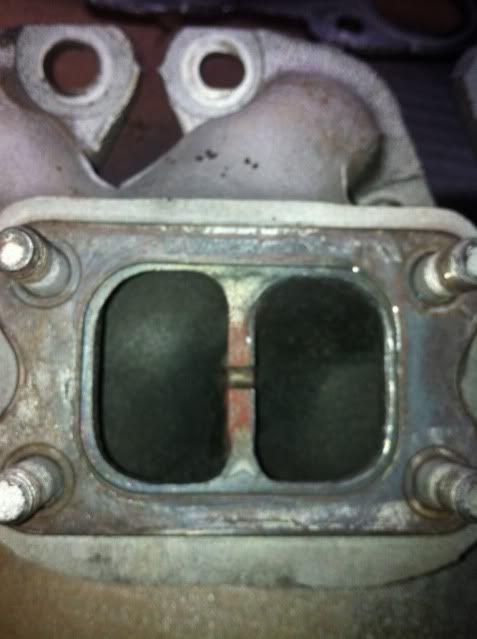
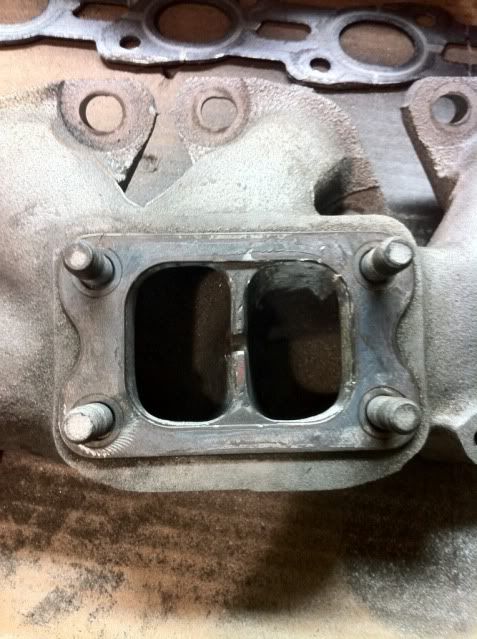
                          Manifold and turbo gasket matching;

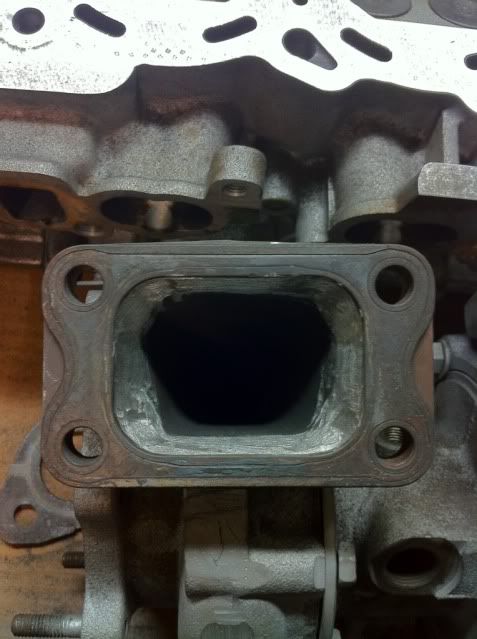
                          Our stock manifold outlet is terribly cast. If you line the gasket up with the bolts you'll see what i mean, there is a ton of excess material that can be shed, the same goes for the turbo.

                          (i started a bit)


                          The outcome is this;


                          Smooth, no more edges and 3/32 of material has been removed.

                          Same for the turbo;


                          The turbo has a big stamp inside the snail, mine was a large 2. The castings are generally just terrible. Anything to maximize flow ensures you're doing everything to extract every bit of power!
                          Check out the GTST Projects page and keep up to date with my build!
                          www.nelsonmx.wordpress.com
                          Like us on Facebook! www.facebook.com/NelsonMX
                          Any part inquiries can be forwarded to marc@nelsonmx.com

                          Comment


                          • so does this mean you've decided on a turbo then? lol
                            The SkyLife Community & News Website --> http://www.skylife4ever.com

                            Comment


                            • Yes.
                              Lol
                              Check out the GTST Projects page and keep up to date with my build!
                              www.nelsonmx.wordpress.com
                              Like us on Facebook! www.facebook.com/NelsonMX
                              Any part inquiries can be forwarded to marc@nelsonmx.com

                              Comment


                              • I wouldn't trust myself with a scotch brite pad and cleaning engine mating surfaces like cylinder bores and head gasket surface.

                                Without knowing, you can apply too much pressure on one side and make a microscopic dimple which will lead to failure.

                                I'd just spend the 150 bux to rehone the blocks properly.

                                Your HG surface should be fine if you use OEM gasket. For MLS gasket, use the straight edge and a feeler gauge. Using just the straight edge and just eye-ing out is not proper.


                                my 2 cents.

                                Comment

                                Working...
                                X