Announcement

Collapse
No announcement yet.

Frankiman's street/track GTR project

Collapse
X
 
  • Filter
  • Time
  • Show
Clear All
new posts

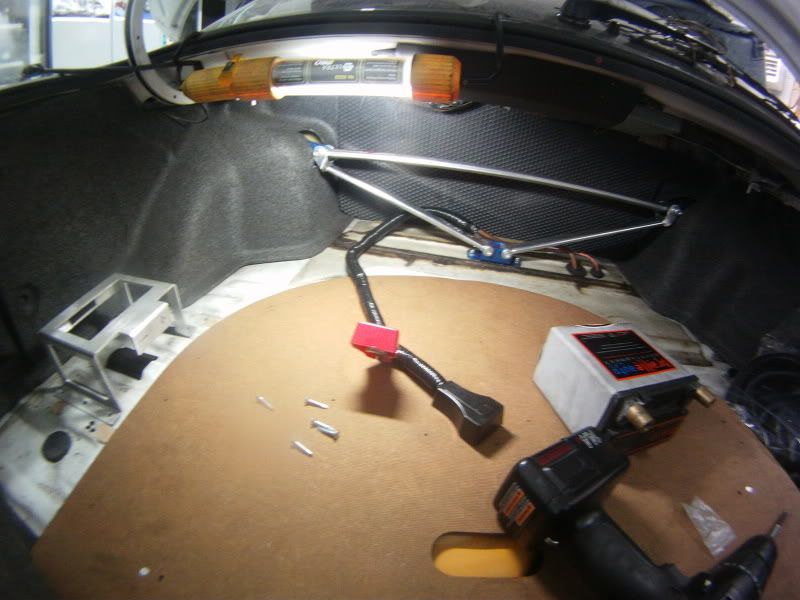
  • i used the eyebolts that came with the harness, very sturdy

    and i'll have a custom harness bar made, but i'm keeping the rear seats for that 2nd passanger capacity, the bar will be pretty well engineered

    and you shouldn't use the seat belt bolts for the harness, because it put the shoulder straps at a negative ~30deg angle, which could compress your spine in the case of an accident, the harness bar will be sitting horizontaly just higher than my shoulder, putting the shoulder straps at a positive ~10deg angle, most sanctionned racing organisations actually require that +10deg angle
    sigpic

    [links to all chapters in first post]

    Comment


    • ah i see your gonna use a harness bar, and ya i know mine sits pretty much flat with where the holes in the seat are, they rest on my cages harness bar too. everything looks sick man!!
      Check out my RB30 build at
      http://forums.gtrcanada.com/gt-r-pro...b30-build.html

      Comment


      • R34 wheels with +25mm spacers?! that pulls it out to +5mm!!

        what coilovers are you using? HKS?
        Last edited by Daryl @ RightDrive; 07-15-2010, 01:58 PM.
        RightDrive Inc. Parts Manager
        http://www.rightdrive.ca :: http://www.rightdriveparts.com :: http://www.rightdriveusa.com
        1970 Highway 7 West, Vaughan, ON :: 1-877-398-8220


        Comment


        • Originally posted by Daryl @ TunerLab.jp View Post
          R34 wheels with +25mm spacers?! that pulls it out to +5mm!!

          what coilovers are you using? HKS?
          yeah you should have seen him smiling, with sparks in his eyes
          i know he told me what his suspension was, but i can't remember exactly what it is, its nothing special i think

          i'm using HKS coilovers, that have just been fully rebuilt by Selex Racing Suspension in Montreal, with new sturdier jam nuts, new bump stops, new rubber boots, and self adjusting valves for a progressive damping curve to match the spring rates
          front is 8kg/mm, rear is 6kg/mm

          perfect for street use, and with a full suspension setup with sitff swaybars its almost pretty good for the track

          this build is all about building the best daily driveable street car that can also win time attacks
          Last edited by frankiman; 07-17-2010, 10:03 AM.
          sigpic

          [links to all chapters in first post]

          Comment


          • dont you mean 8k front 6k rear??
            RB25 Powered RWD GT-R

            Owner for Turtle Garage Hicas Delete Systems

            Comment


            • Originally posted by ryano1515 View Post
              dont you mean 8k front 6k rear??
              oh right !

              ^^fixed
              sigpic

              [links to all chapters in first post]

              Comment


              • Chapter 22 - Finally some visible results, week11, part1


                ------------------------------
                Day 35


                When i got home from work that day, i had another box sitting next to the door,
                Ohhh what could this be..

                Finally, my p/s cooler came in, the final piece in my cooling setup

                It’s an Hayden (Australia) transmission oil cooler kit, complete with hoses and all mounting hardware, and general instructions
                Really a great kit, high quality, low price


                I wanted to fit it where the OEM weaksauce cooler was,
                So just to make sure it wouldn’t be in the way of anything important, I put the BOV recirc piping back in place, if the cooler takes only the place of the piping its perfect since I’m not using that piping anymore


                Then test fitted it in place, and saw that it would be sitting against the lower rad frame, so I cut a piece of the thickest packaging foam I could find, and glued it on with 3M spray-on adhesive


                Then used the supplied brackets to fabricate the first mount
                The kit includes 4 stainless steel pre-drilled brackets, that are really easy to bend,
                I found 2 threaded holes underneath the frame that weren’t used, so that’s what I’d use to mount the brackets

                The first hole didn’t line up with the cooler core’s pre-drilled holes, so I drilled a new one on the press drill, then used a mix of my own stainless bolt (metric, for the frame) with some supplied in the kit (SAE)


                Then used the second hole, and cut and bended another bracket in 2 “L” shapes, reaching the core’s holes, ninja style


                Then I used the supplied snake style zip ties,


                And set it up like this


                You force the zip snake through the fins of the condenser with a very dense foam pad on each side to avoid damaging the fins due to vibrations

                How it looks from the back of the condenser;


                Then snaked my braided lines through the same hole the OEM ones go through, then around the AC canister, plugged then on and tightened them solidly with small t-bolt hose clamps
                I had to cut one of the two lines about ¾”, which without a proper saw is a real PITA


                I had to cross one line over the other so they wouldn’t be kinked too much


                Then I wanted to make another bracket to hold the longer line to keep it from coming into contact with anything else around it, but because the radiator frame has a small lip on it, I couldn’t get the bracket to fit considering my radiator cooling plate would also bolt into the same spot

                So I grinded it down,


                Then tightened it with a neoprene hose clamp,
                The p/s oil cooler was fully installed within 8 hours of receiving it, pure win


                And I also got my aforementioned aluminum radiator cooling plate from daryl, ready to replace my oldschool steel one (which has just been powder coated flat black, and will be up for sale soon)


                And the driftworks total hicas eliminator kit FINALLY came in,
                It “looked” really good, but has you’ll see, the quality would be quite horrid


                ...part2 after the jump..
                sigpic

                [links to all chapters in first post]

                Comment


                • Chapter 22 - Finally some visible results, week11, part2


                  ------------------------------
                  Day 36


                  Before starting to install the driftworks kit at all, I read the tutorial they had in their forum section, because they don’t offer any instructions,
                  In that tut, the guy had a hard time pressing out his old ball joint and ended up needing 4,5 tons of pressure

                  So on Friday night, I called a friend’s ghetto mechanic, who has an hydraulic press in his shop, I get there, and he says he could probly do it with an impact gun and a huge C clamp, and it worked, I guess it was because my ball joint (and overall car) was in pretty good condition, anyway.. wasted 20$ there


                  Then, on Saturday, just after I had finished writing up my previous chapter, I came out to the garage, ready to just bolt the darn kit on,

                  And then the shiit started…

                  i start by removing the hicas actuator


                  Just two bolts at this point, no hydraulic lines since they were already all removed


                  thing is i don't know exactly how the mount the brackets, because it isn't explained anywhere
                  so i try to fit the bracket on the pass side (left), and i can't figure out how the hell its supposed to mount, the fact that the exhaust is in the way doesn't help


                  so i try to mount the driver side bracket
                  and i figure out you need to bolt the bracket with the arm through an unused hole in the subframe, oh ok

                  but i can't get the arm's bushing to fit in the bracket, because theres too much paint ! (issu #2)
                  so i had buff some of the paint off with my bench buffer


                  then i got it on no problem


                  so now that i know how it goes, i go back to the pass side and for all the gold in the world it wouldn't bolt in

                  so i take a closer look at the bracket, its fawking bent !! (issue #3)


                  heres another view with my camera phone


                  you can clearly see the bracket wasn't welded properly and the two bolts aren't parallel at all, the longer bolt is about ¼" off center from the hole in the subframe where its supposed to go

                  so i tried to make the hole bigger by using my press drill as a milling machine, but i don't have milling tools like 99,9999% of people, so i use a reamer which just didn't cut it


                  then i take the biggest drill bit i have, ½" (the bolt is 12mm, and ½" = 12,27mm) and try to pry it around to make the hole oblong (if you don't know what it means, google it)


                  and ended up breaking my drill bit 3 times


                  but since the darn bracket is so thick, i only endend uo making the holes countersunk on each side, so still doesn't work, Driftworks is going to hear about this


                  so after 2 hours of messing around for nothing, i move on to the bushings

                  when i read the tut on driftworks forum, it said the bushings came in two parts that needed to be pressed in the ball joint section of the knuckle

                  hey look at that, its one piece, and not even large enough !!! WTF (issue #4)


                  so i had to cut it in two bits


                  and you can clearly see the gap between the two halves


                  then greased the outside of the metal sleeve and used a small C-clamp with the stock ball joint cap to press them in


                  oh and i still have 4 locking nuts left that i have absolutely no clue wtf they are for because there is no instructions (issue #5)

                  bravo driftworks, bravo, you can make sure i'm never buying your stuff ever again


                  just to sum it all up

                  issue #1; no instructions with a brand new kit, that isn't really a bolt-on affair
                  issue #2; paint is too thick, metal arm's bushings won't fit
                  issue #3; passenger side bracket is bent, or not welded properly, call it whatever you want its scrap
                  issue #4; poly bushings isn't wide enough, and requires cutting in 2
                  issue #5; left over fasteners that i don't know where they go because (refer to issue#1)


                  ------------------------------------------------------------------------------

                  So I decided to move on to something else

                  I call up a buddy’s buddy, who just bought a sandblast machine
                  I wanted to clean my intercooler with a bit of bead blasting, but all he had was sand, so I bought a 50lbs bag of glass beads

                  I get there and his sandblast machine is just a compressor with a blasting gun… seriously? I could have just borrowed the gun

                  Anyway... I cleaned the greased up parts between the fins
                  Just a note about doing this sort of stuff, if you have a sandblast booth, use it, if not, get a full face mask and long sleeves and keep your mouth shut
                  I was still biting down on glass beads the next morning…


                  Then I went back home and started working on putting the whole rear suspension and wheel assemblies back together


                  Zip ties are my best friends


                  Anyone that has taken the rear suspension apart knows that because of the designs of the brackets that the different arms bolt onto, its actually pretty hard to get a good grip on the bolt heads and nuts with a socket or even just a box wrench

                  Knowing that all the bolts are about ½” too long, I could use washers the space the bolt heads out of the brackets

                  So I looked through my dad’s stash, and found 2 boxes full of 100 (each) ½”x¾” washers, sweet

                  And instead of using washers on the nut side, I found a bunch of huge flange/crown nuts from my old car that would do the trick perfectly

                  So I started by bolting the Nismo traction links on


                  Using a bit of anti-seize, I was going to reassemble the hubs / bearings / back plates / knuckle together
                  Don’t forget to grease the bearing to death


                  Everything was going well, till I found out the lower control arm, the edge where the lower ball joint is, was coming into contact with the back of the back plates


                  Problem is, the oem back plates are ~1/16” thick, and have a recess shaped into the sheet metal where the lower ball joint pivots, but my custom fabricated back plates are twice the thickness and have no recess

                  I did try to grind off some of the metal a couple weeks ago,


                  But it wasn’t enough, and like an idiot I didn’t grind the exact spot I should have

                  Discouraged, again, I left it at that and went to bed

                  ...part3 after the jump...
                  sigpic

                  [links to all chapters in first post]

                  Comment


                  • Chapter 22 - Finally some results, week11, part3


                    ------------------------------
                    Day 37

                    So, Sunday morning..
                    What kind of specialty store that sell milling tools is open ?
                    NONE
                    So I go to a small tool store 2 minutes from where I live, where they sell almost only Chinese stuff, but it’s really cheap, so its not too bad

                    So I bought a 36$ kit of huge drill bits (½”-1”)


                    Then ripped the shiit out of the brackets,
                    Don’t forget the lube, a greasy machining lube is best, but a constant spray of WD40 can also work


                    The aftermath, man I never felt my press drill shake so much
                    Reminds me the time when I used to be a machinist


                    After everything was cleaned, meet the new ¾” holes


                    Then I actually got the darn bracket to bolt on,


                    But since the bracket was bent, there was still a gap between it and the subframe,
                    So I filled that gap with a ½” washer and tightened all the bolts to 65 ft.lbs


                    And finally bolted the whole thing


                    -------------------------------------------------------------------------------

                    After that was done, I went back to face my back plate problem

                    I had 2 choices;

                    1. the simplest, drill a hole in the back plate, to allow enough space for the edge of the lower control arm to pivot around the lower ball joint, but at the same time the lower ball joint would be directly exposed to the extreme temps of the brake rotor while on the track
                    2. the trickiest, grind the problematic edge of the lower control arm, without without making it any weaker, or damaging anything else

                    I went with option 2
                    Yup, I grinded the LCA


                    After a bit of buffing


                    And now that everything fitted, I could get back to putting it all back together
                    Every bolt got its share of fluid; anti-seize or all-purpose grease or loc-tite
                    And they were all torqued to spec (PDF shop manual FTW)


                    The trickiest part of the whole thing I think, since I never took the lower ball joints apart, was to hold the wheel assembly in my lap, while aligning the 2 bushings of the LCA with the subframe while also aligning the axle’s splines with the hub’s, at the same time

                    Again, I greased up the splines with all purpose automotive grease


                    Then bolted all of the different suspension components, to spec, with the washers and flange nut and a bit of grease on the bolt body to keep them from forming rust
                    At this point, none of those bolts should be torqued, just “finger tight”


                    Then what do I see, the darn driftworks kit again, is all wrong
                    Theres a good gap, at least 1/8”, but when you consider the split bushing is now ¼” larger than it was, it means the gap should be ~3/8”, omg


                    And since the tut on driftworks forum suggested to put the bolt from the inside, because you would have clearance issues with the damper, well thats what i did, but then when the damper is on, you can't take the bolt out

                    so i used the "undo" button, put it the other (right) way around and added a spare ½" washer to fill the gap


                    Then, from old pictures I had, I set the ride height back to where it used to be before the coilovers got rebuilt


                    Now is when we all learn something,
                    Before thightening anything you have to make sure that the whole suspension assembly is at ride height

                    To do this, simply put a jack right under the coilover, where it bolts to the knuckle, then jack it up, compressing the spring, till you see the car lifting off the jack stand, when it does, you know all the car's weight on that corner is only supported by the suspension


                    in my case, i stopped jacking when i saw the 2x4 slightly move, meaning it wasn't supporting the car anymore


                    why do this?

                    its because you don't want to induce any preload in the bushings,
                    all the bushings are rubber, and have a spring rate, if they are all thightened at ride height (where the car will spend 99,99% of its time) all the bushings will be at a neutral position

                    if you don't do this, then you tighten the bolts when the spring is at its longest (full droop) and when the suspension is back to its normal ride height, the bushings will all be compressed (torsionnally) which will F up you overall spring rate, and the bushings will wear out much MUCH faster

                    then i torqued all the bolts to spec (~65 ft.lbs)

                    at the same time, i bolted my Whiteline adj swaybar endlinks,
                    since there are adjustable, unlike the stock ones that you can just bolt on no problem, you need to calculate at what lenght you need to bolt it to the LCA

                    while the suspension was compressed, i moved the swaybar around to imagine its full travel angle, then set it near the middle, and left 60% of its travel for compression, and 40% for droop
                    because the wheels will be in compression much more often than in droop


                    then i also bolted the Garage Saurus brackets


                    then at this point, i had been working on this corner for about 4 hours (off and on), making sure everything was perfect, torqued to spec, lubed, adjusting, etc etc
                    and when I started to put the handbrake assembly back together, i couldn't get the rearward shoe on, at all, WTF


                    then i realized i didn't have the right bearing housing, i was on the driver side with the passenger side's housing


                    ohh and..


                    i threw my gloves, kicked a plastic bad and emptied a full water bottle, thats how pissed i was
                    no but seriously, I blood was boiling

                    than my dad came to check up on me, has he was checking the oil in the truck before leaving for the chalet, he tried to explain to me how i could get around the problem,
                    and i showed him, theres no F-ing way, I have to take the whole dam thing apart again, Fawk

                    i was pissed, it was late, I hadn't eaten yet, so i called pizza hut, and went back to work,
                    i grabed the impact gun,
                    and this is how it looked 25 minutes later when the delivery guy arrived


                    heres the difference between the two bearing housings, the darn little pin is in the way of the handbrake shoe


                    part3 continued......
                    Last edited by frankiman; 07-17-2010, 02:43 PM.
                    sigpic

                    [links to all chapters in first post]

                    Comment


                    • Chapter 22 - Finally some results, week11, part4


                      ------------------------------
                      Day 37 continued

                      after i'd finish my pizza and back out to the garage to finish the darn job

                      so i didn't fully unbolt the LCA, to make it simpler,
                      then bolted a couple things and after 20 minutes i realized i had forgotten to put the backplate on...


                      so i pulled it apart and all back together again, geez

                      then, by looking in the shop manual, i saw that i didn't have the little rubber "insulators" that go over the axle nut


                      but during my last visit at Tuboquip, i grabbed some generic hydraulic seals, which just so happened to have the right inner diameter

                      but they were too thick so i grinded it down to about 1/3 its thickness, pushed it on it worked fine


                      last time i took the suspension apart, i didn't put in a new insulator, which caused the "adjustment cap" to vibrate and make ALOT of noise


                      adjusted the handbrake tension, and i was done for this,
                      though i might pull the rotors to apply some high temp clear coat so they don't rust


                      in these shots;

                      HKS coilovers rebuilt by Selex Racing Suspension, AMS adj RUCA, Nismo traction link, Drfitworks Total HICAS eliminator kit, modified RLCA, 340mm custom back plates, Garage Saurus 330mm rear conversion rotors, Garage Saurus rear 330mm conversion brackets, Solid subframe bushings, Ichiba bolt-on 15mm spacers,, Whiteline adj swaybar, Whiteline adj swaybar endlinks


                      ------------------------------
                      Day 38

                      so on monday night, i worked on the passenger side of the rear suspension, and this time i made sure i had everything i needed at hand's reach so i wouldn't have to get up again


                      not to forget all lthe specs


                      and heres a trick for anyone putting the handbrake assembly back together,
                      its tricky, but assemble the two shoe, the lower srping and the adjuster all thogether, then snap it over the hub and your almost done


                      and when i tried to attach the cable to the rearward shoe, it seemed 1" too short, WTF
                      then i realized the handbrake lever was pulled, oups..

                      all done, within 2,5 hours


                      the trick on the second side is to connect the swaybar last,
                      since if you connect it first, then lift the suspension, you'll actually lift the other side of the car at the same time,
                      so when everything is done, then you can connect the endlinks and adjust them exactly the same as the first side


                      ------------------------------
                      Day 39

                      on tuesday, i picked up the aforementionned supplies that i had ordered to finish the battery relocation


                      i scrapped the ugly plexis plate, blocked all the whole in the floor

                      then i wrapped both cable together with the plastic protective loom and taped it all


                      then i placed the aluminum box where it would go and traced the cartboard spare tire cover then cut it up


                      haa the nice smell of burning wood

                      then i put the carpet over, and did the same


                      then, using the self taping screws, I screwed it down pretty solidly through the floor

                      thats how it looked when i was done


                      and immediatly i didn't like it, because anything left in the trunk could come into contact with the battery posts, and the cables are kind of in the way


                      ------------------------------
                      Day 40

                      so i untaped all the loom and spun the battery box 180deg

                      pulled different lenght of cables and taped it all back with the loom

                      now it looked much cleaner and safer


                      ohh and i also got my parts back from powder coating (most) finally !

                      big ol' box


                      yeah you can drool...


                      but the thing is, they didn't open the bleeders when baking the calipers, so the small bit of brake fluid still left in the calipers came out from the back of it, burning the paint in its path


                      the rear calipers weren't too bad, but the front were much worse, so i told him the do them again,

                      and also, the spark plug cover wus lighter than the rest, so i sent it back too,

                      and it was supposed to be ready for thurday night, its now saturday i haven't got them still... dammit

                      and i also get good functionning hicas P/S pump from natetheguy, thx man !


                      then i tried to bolt on my rear calipers, just for fun, and because the brembo have and different design from the stock sumitomo, when the bracket is bolted to the knuckle, the caliper hits the knucle and can't bolt to the bracket


                      i've drawn various design in 3d for the bracket and i always have to same problem,
                      so i guess i'll have to grind down both the caliper and the knuckle a bit to make it work


                      /week11

                      i pretty much have all the part i need now,
                      but i'm still waiting on my oil cooler line from Tuboquip, which told me tuesday they finally had the -10 45deg fitting and that they would get the line shipped by Dicom the same for 1 day delivery,
                      long story short... i never got it
                      i'm tired of beeing treated like an idiot by those asssholes, so monday i'm going to the shop to stir up some crap
                      Last edited by frankiman; 07-18-2010, 12:28 PM.
                      sigpic

                      [links to all chapters in first post]

                      Comment


                      • sucks to hear about that driftworks kit. im happy i didnt buy one now
                        RB25 Powered RWD GT-R

                        Owner for Turtle Garage Hicas Delete Systems

                        Comment


                        • Very nice build, I want your suspension lol
                          1992 Dark Blue Pearl Skyline GTR - 457 rwhp, 404 tq @ 19 psi , chevron 94.
                          1991 Gunmetal GTS4 - SOLD

                          Originally posted by dah_hunter
                          i wait till the lights yellow.. or i lean far and go.. thats what BOOOOST if for..

                          Comment


                          • Originally posted by Shane_Sawatzki View Post
                            Very nice build, I want your suspension lol
                            i want his car!
                            If you're not first you're last

                            Comment


                            • Wow!! You'll know your car in & out after all the small mistakes lol! Don't give up!
                              P.S. I would publish this thread or something close.
                              03 lancer dead
                              68 gmc w/355 cid rice killer
                              05 chevy silverado L33
                              2010 crv Wife's ride
                              1987 Harley Softail custom

                              Comment


                              • Originally posted by GTRADDICT View Post
                                Wow!! You'll know your car in & out after all the small mistakes lol! Don't give up!
                                P.S. I would publish this thread or something close.
                                how/where could it be published ?
                                sigpic

                                [links to all chapters in first post]

                                Comment

                                Working...
                                X